Pentaho Data Integration (PDI/Kettle)
Pentaho Data Integration (PDI/Kettle) is a tool to integrate data, responsible for extract, transform and load processes (ETL).
It can be used as an independent application or as a part of Pentaho Suite. Since it is an ETL tool, its functionalities are generally focused on data warehouse development. Nevertheless, it can be focused on the following aspects:
-Migration of data between applications and databases.
-Exportation of data from database to files
-Data cleaning
-Integration of applications
-Process automation
At this chapter we focus on the creation of a project on PDI. Therefore, a step-by-step approach is used, with print screens and an easy language.
Installation and Configuration
Currently, the latest stable version is 5.4.0.1-130.
File: pdi-ce-5.4.0.1-130.zip
Size: 695 MB
Download: http://sourceforge.net/projects/pentaho/files/Data%20Integration/5.4/pdi-ce-5.4.0.1-130.zip/download
Installation process:
- Download PDI: http://sourceforge.net/projects/pentaho/files/Data%20Integration/5.4/pdi-ce-5.4.0.1-130.zip/download
- Unzip pdi-ce-5.4.0.1-130.zip file
- Run spoon.bat (Windows) or spoon.sh (Linux)
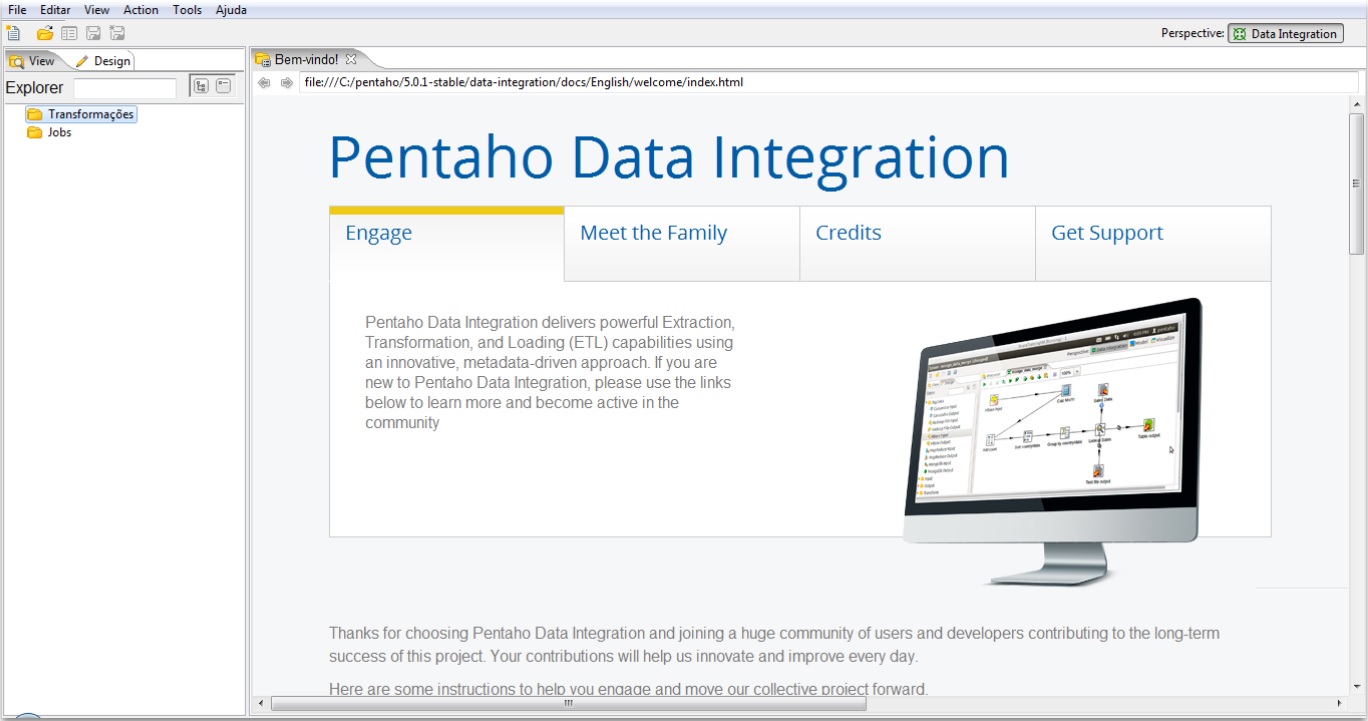
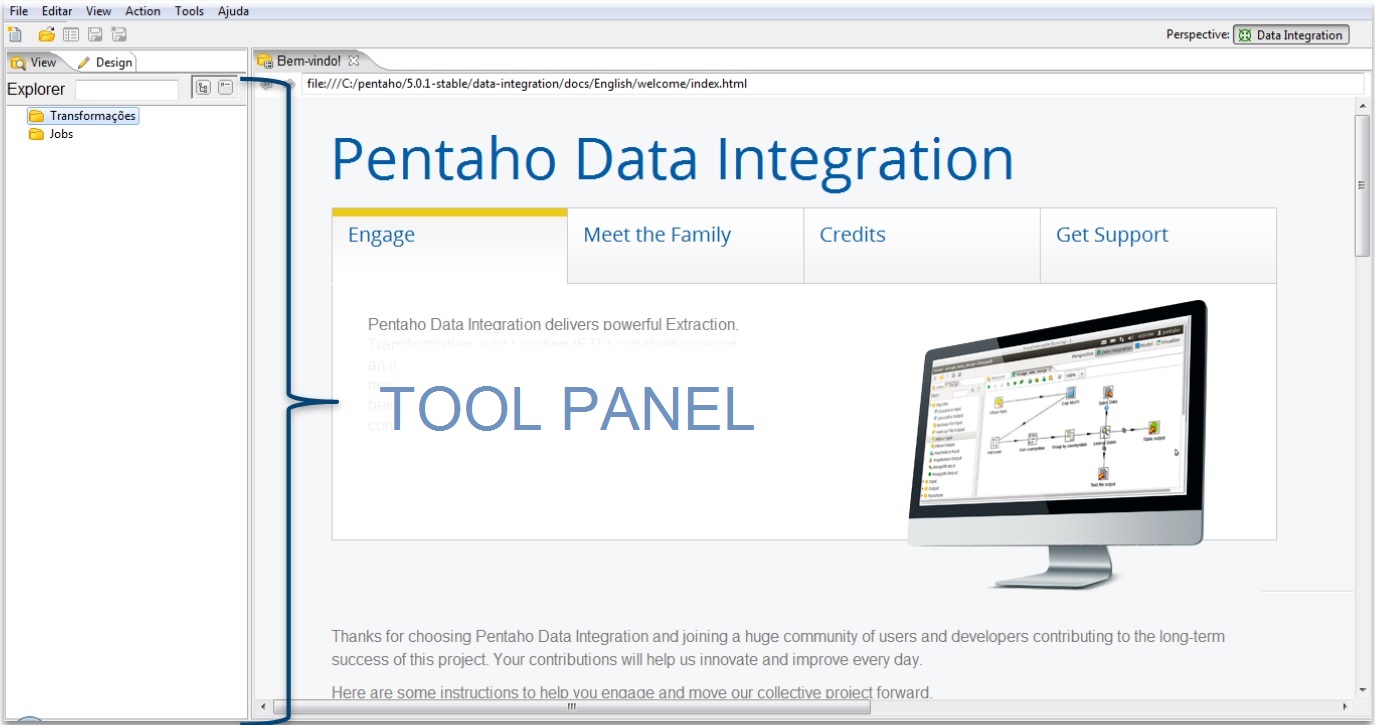
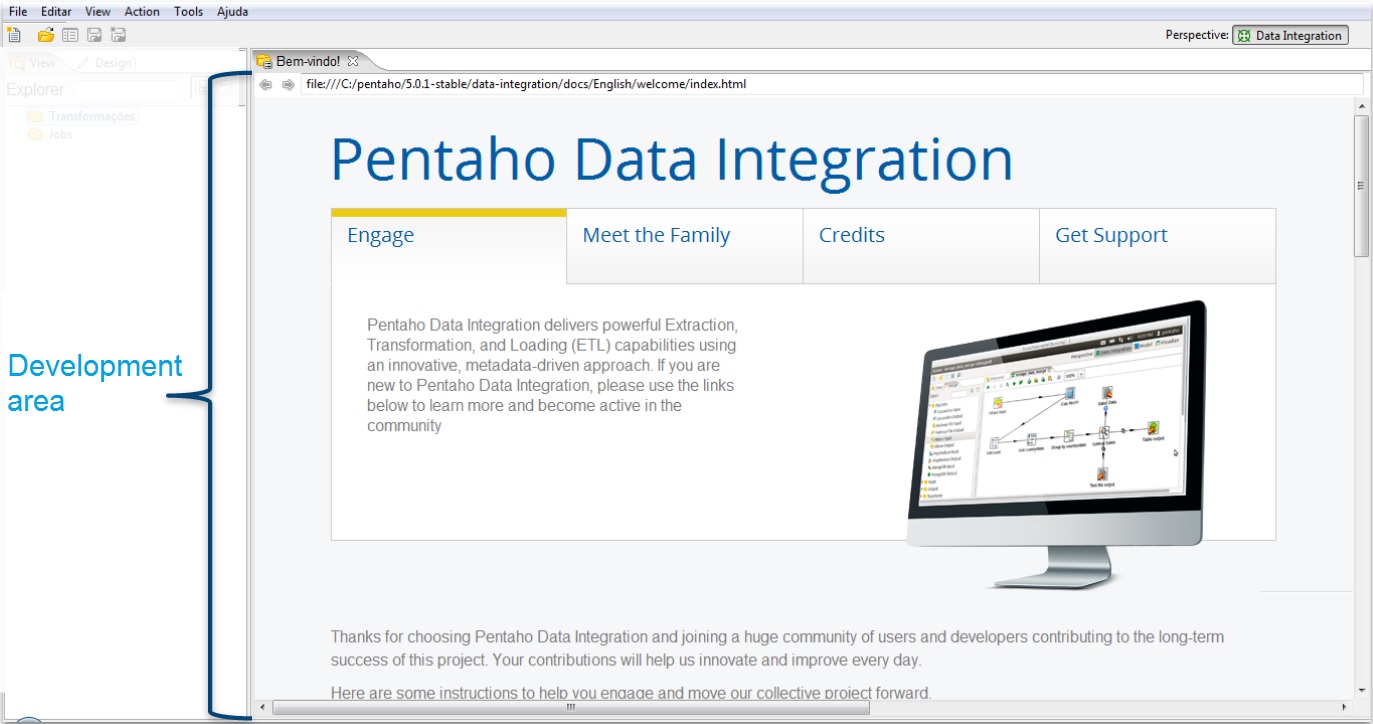
- The following screen should appear:
Repository configuration
When PDI opens, the screen to configure repository is presented.
The connection with repository allows the saving of transformations and jobs in a preferable place.
In cases where the specification of the path is not the focus, close the window. This action will store jobs and transformations on a local machine .
To add a repository, click on (+)
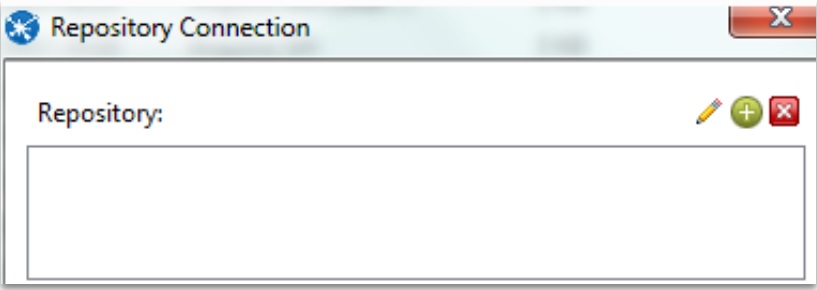
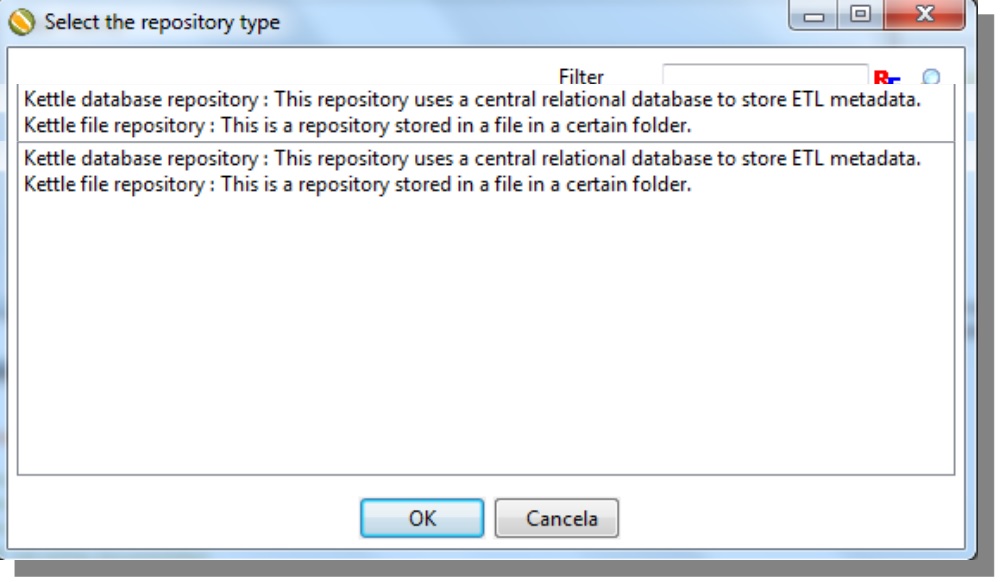
There are two ways to configure your repository
1st Store transformations and jobs inside database “Kettle database repository”
2nd Define a folder and use it as a repository “Kettle file repository”
Whether the initial screen will not open, follow these steps to access it:
Tools-> Repository -> Connect to repository
Select one of the two options and click on Ok.
Click on new to configure a new connection with the server

The software allows connections with the main databases: Oracle, SQL Server, MySQL, PosrgreSQL, Firebird, IBM DB2, and others.
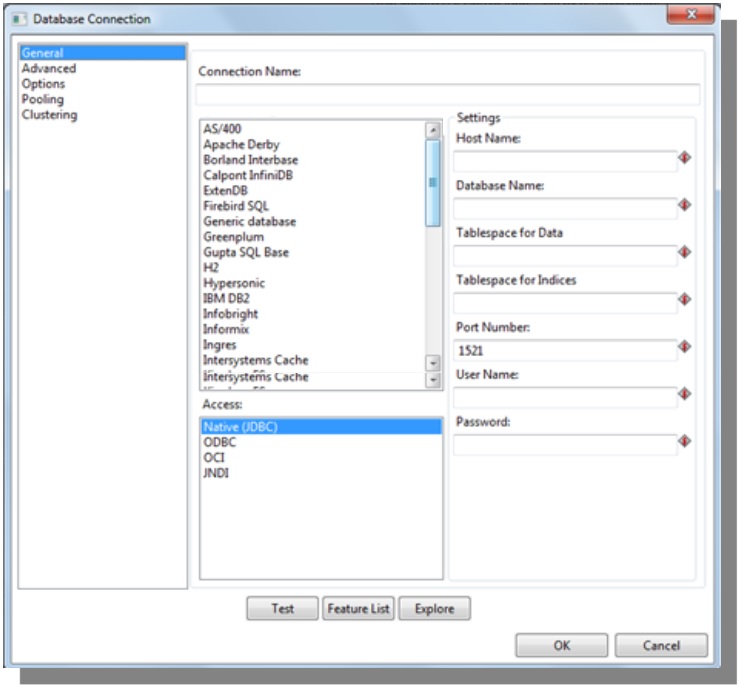
Select the database and complete the following fields:
- Connection name
- Host name
- Port number
- Username
- Password *
*It is recommended to write down the password in order to edit the connection in the future
Click on OK to proceed with the configuration

Complete ID and Name fields

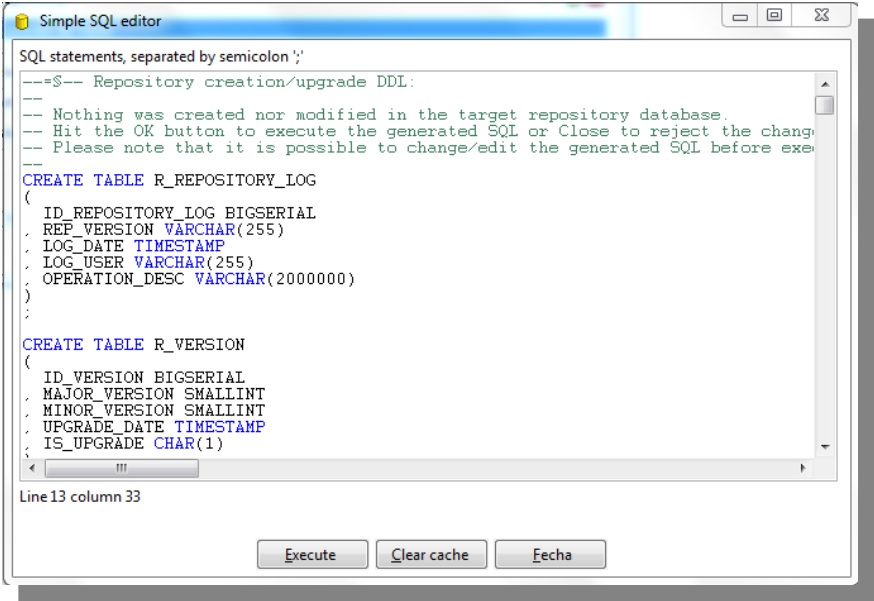
Click on Create or upgrade to create the necessary structure at the database
Execute -> OK -> Cancel -> Ok
Organizing folders

Right click on New Folder -> Folder name -> Ok
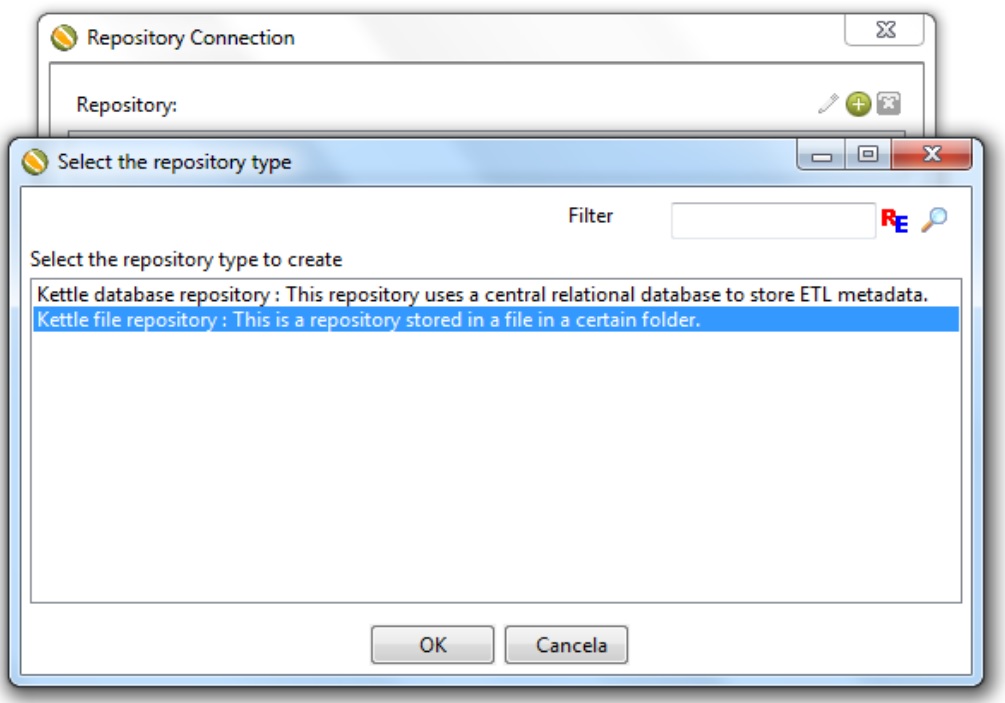
Select the option according to the following in order to configure repository to a text mode (.ktr and.ktb). Click on OK
Exporting/Importing Repository
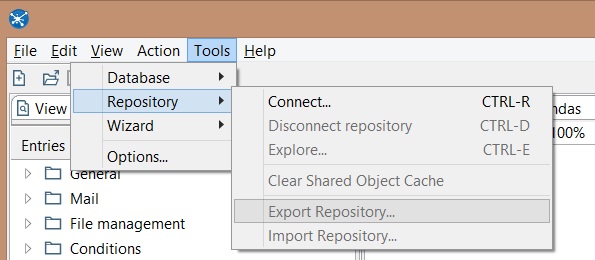
Click on Tools -> Repository -> Export Repository... Save in a convenient folder
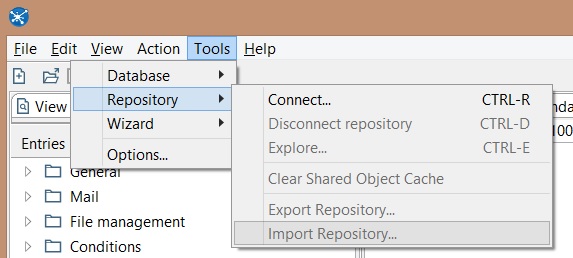
Click on Tools -> Repository -> Import Repository
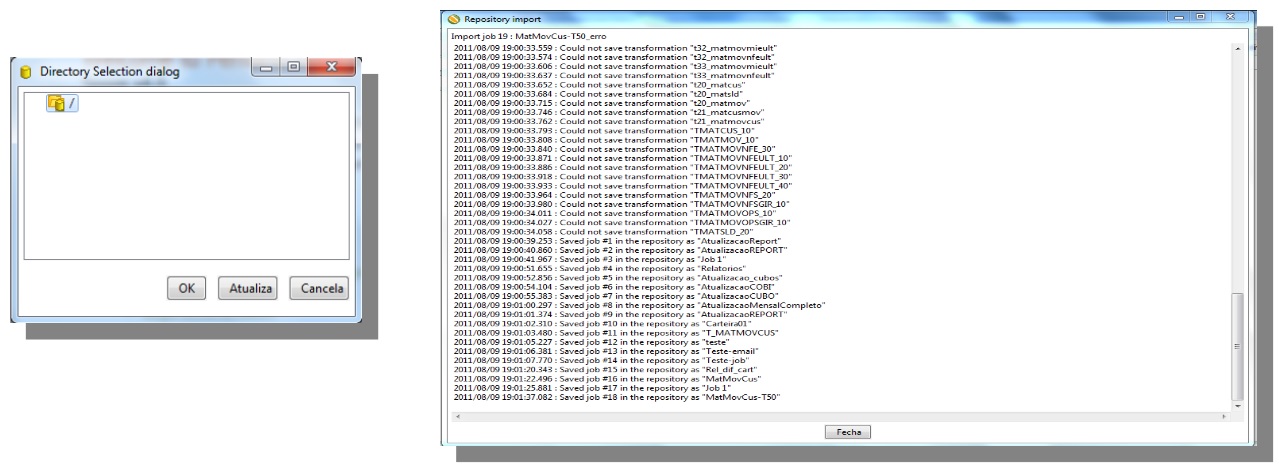
After the selection of a file to be imported, click on Ok to inform the repository storage diretory
Transformations
Transformation is a routine with a collection of connected steps
The first step represent the data source and the last one the data output
 |
 |
|---|---|
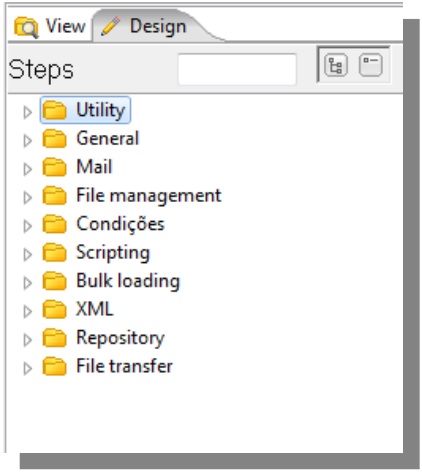
Jobs
Job is a routine that allows, among many actions, run transformations or jobs.
| |
| 
Step
Step is the minimum unit inside a transformation.
There are three basic types of steps
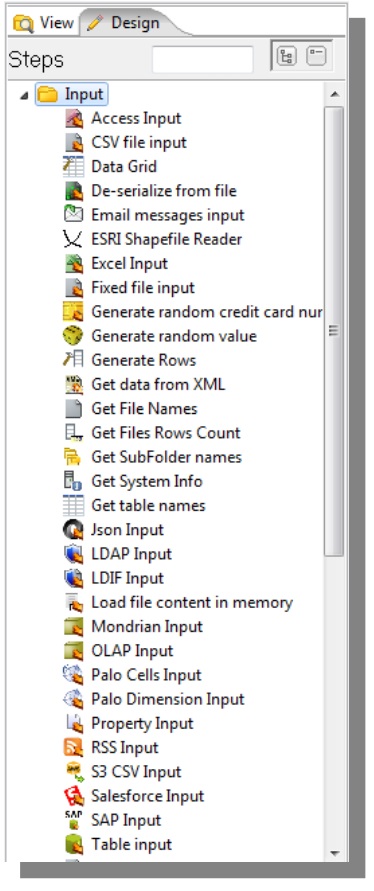
- Input
- Transformation
- Output
The steps are easily created using drag and drop process.
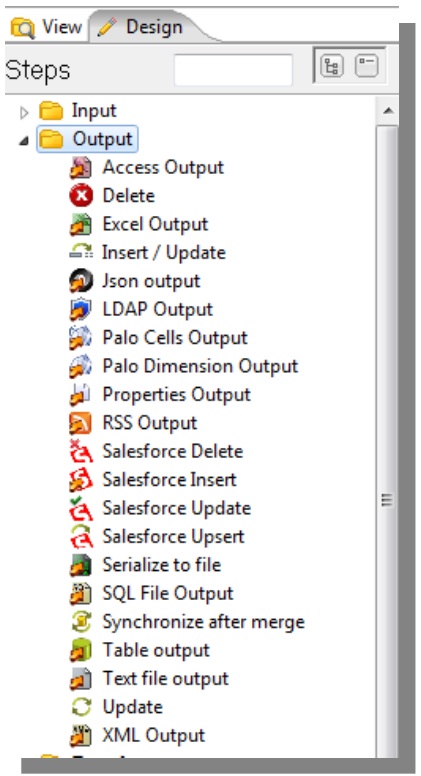
At the tool area a list groups many categories of steps.
Hop
Hop is a graphic representation of data flow between two steps.
The connection between two steps can be created clicking on the step of origin, pressing shift button and dragging it until the step of destiny

Transformations and main steps
Formula
This step allows the creation of formulas as calculated fields, fields with constant values, logical conditions, string formatting, comparison operators and others.

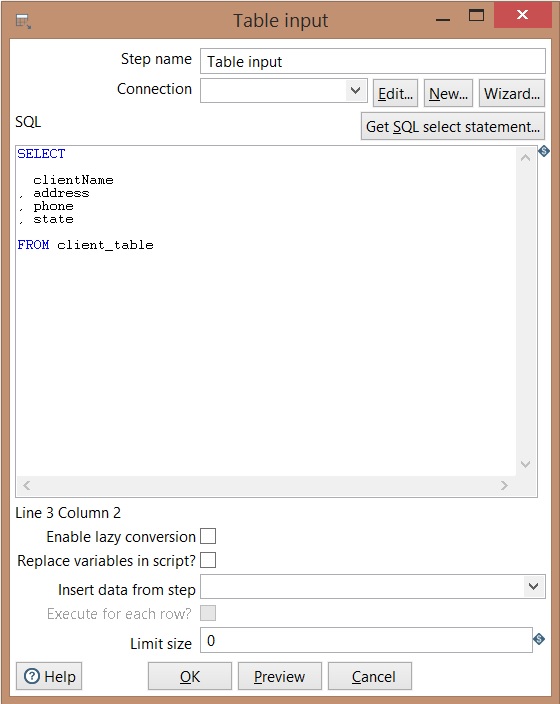
Table input
Create your connection -> insert step name -> insert your SQL query -> Click on preview to verify the query result -> Ok
| |
|
Table Output
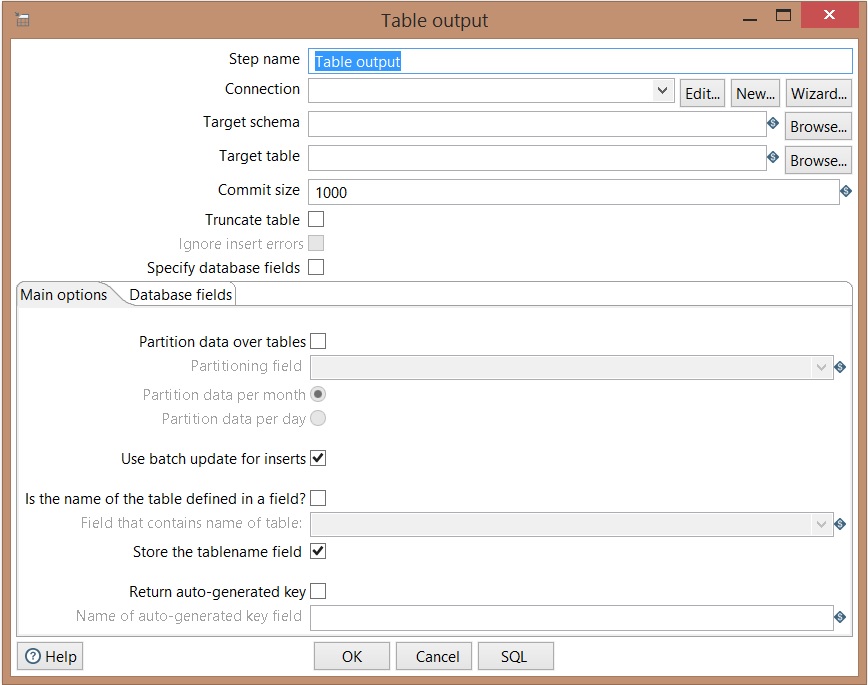
Truncate: Before data insertion, the data of the table is deleted. Check off this option if an incremental load needs to be done.
If the table does not exist, click on SQL to create it
Insert / Update
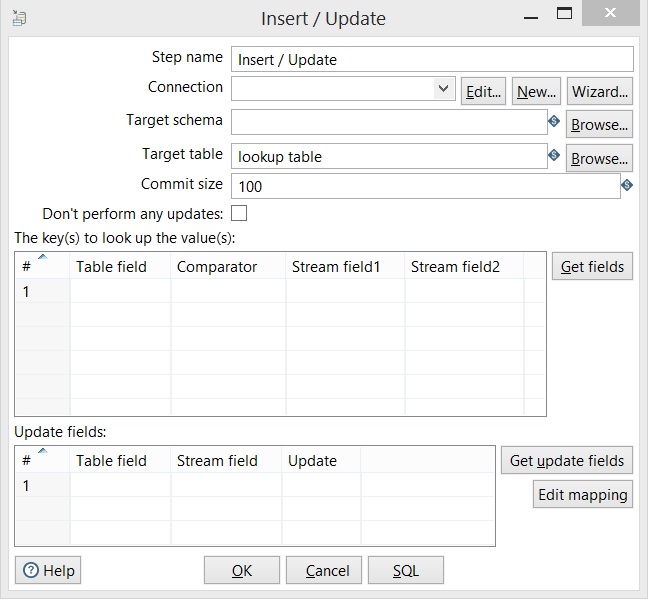
Configuring connection -> inform that table will be updated.
Don’t perform any update:
If enabled, the data on database will never be updated, except if an insert is performed.
Inform the primary key of source table and target table;
Inform the name of the field of origin and the target field.
Select Y or N to configure the fields that will be updated.
Database Lookup
It configures the connection, target table, key and the condition to run a search on database.
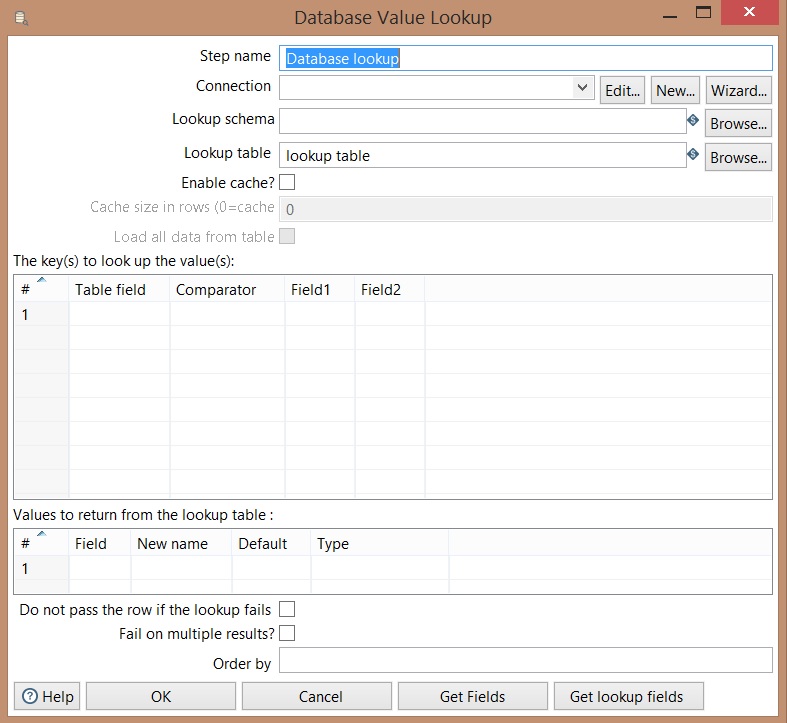
Get fields: Returns a list of available fields of input flow
Get lookup fields: Return a list of available fields that can be added on outuput flow.
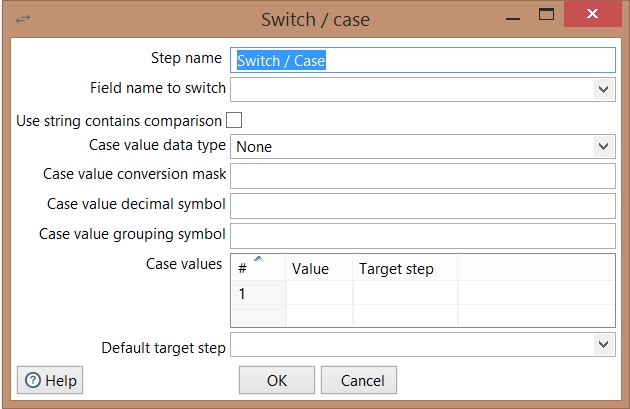
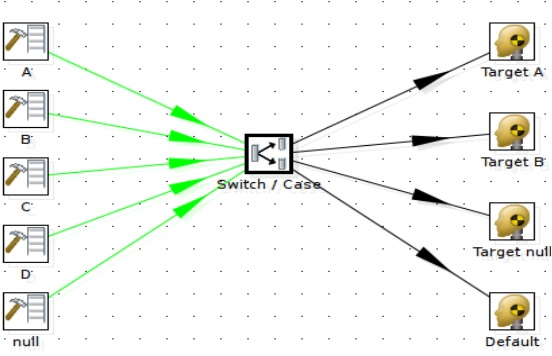
Switch / Case
Replace in String
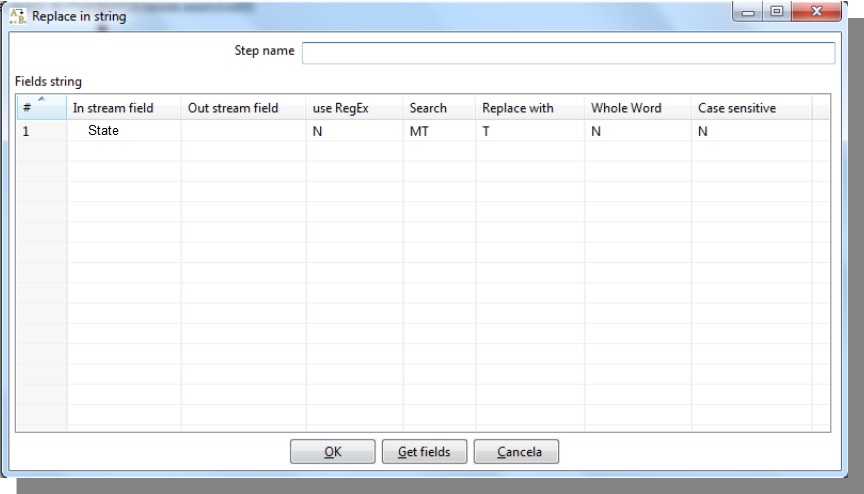
In stream field: base field to search
Use RegEx: use regular expressions and group references
Search: Value that will be searched or replaced
Replace with: Value that will overwrite Seach value
Whole world: Put Y when the whole word will be replaced or N to replace a specific part
Case sensitive: inform if it is a case sensitive field with Y or N
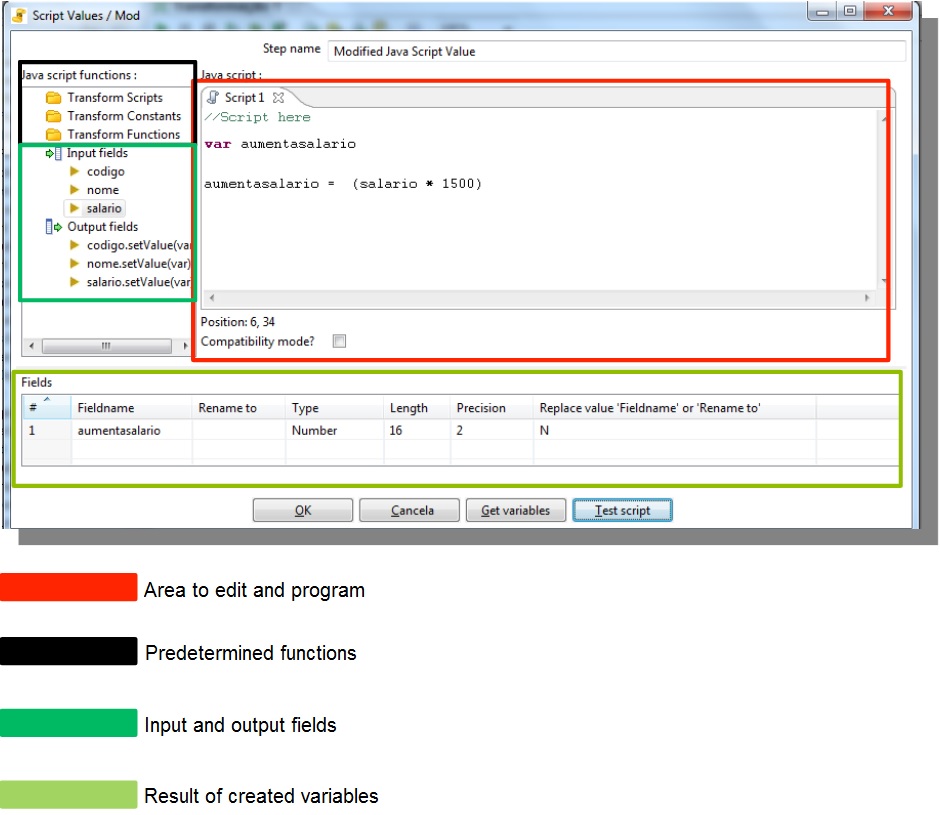
Java Script
Calculator

New field: Field name;
Field A: first value;
Field B: second value;
Field C: third value;
Value type: Type value of the calculation
Precision: quantity of decimal places
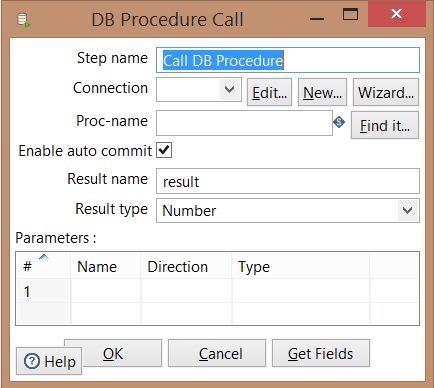
Call Procedure
Value Mapper
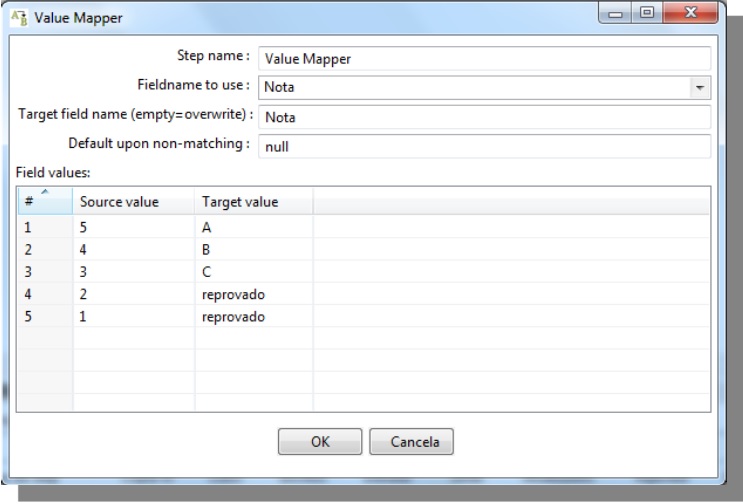
Fieldname to use: field that will be used as mapping source
Target field name: Field that will be mapped
Default upon non-matching: Define a standard value to situations where the value of origin does not fit the mapping
Mapping (sub-transformation)
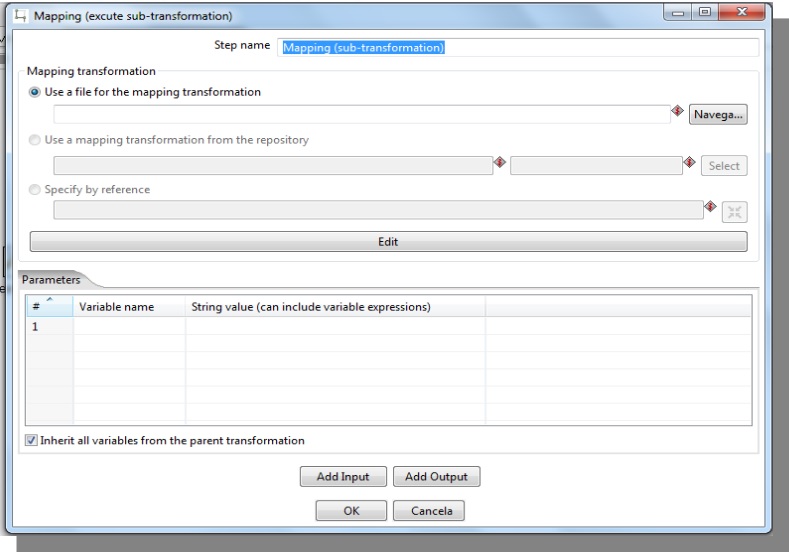
Mapping transformation: Refer the transformation used to map;
Parameters: Allows the definition of variables in the mapping;
Add Input: Each input is one mapping step
Add Output : Each output is one mapping step.
Mapping (Input)

Input source step name: Name of input step at the “Father transformation” (not the name of the mapping);
Mapping target step name: Name of mapping input step (data line to be mapped);
Is this main data path: Verifies if the above fields are empty;
Ask these values to be renamed back on: Rename files before they will be sent to the mapping;
Step mapping description: Mapping description.
Mapping Output

Mapping source step name: Name of input step at the transformation where data will be read.
Output target step name: Name of input step at the current transformation;
Is this the main data path: Verifies if the fields above are empty;
Ask these values to be renamed back on: Rename files before they will be sent to the mapping;
Step mapping description: Mapping description.
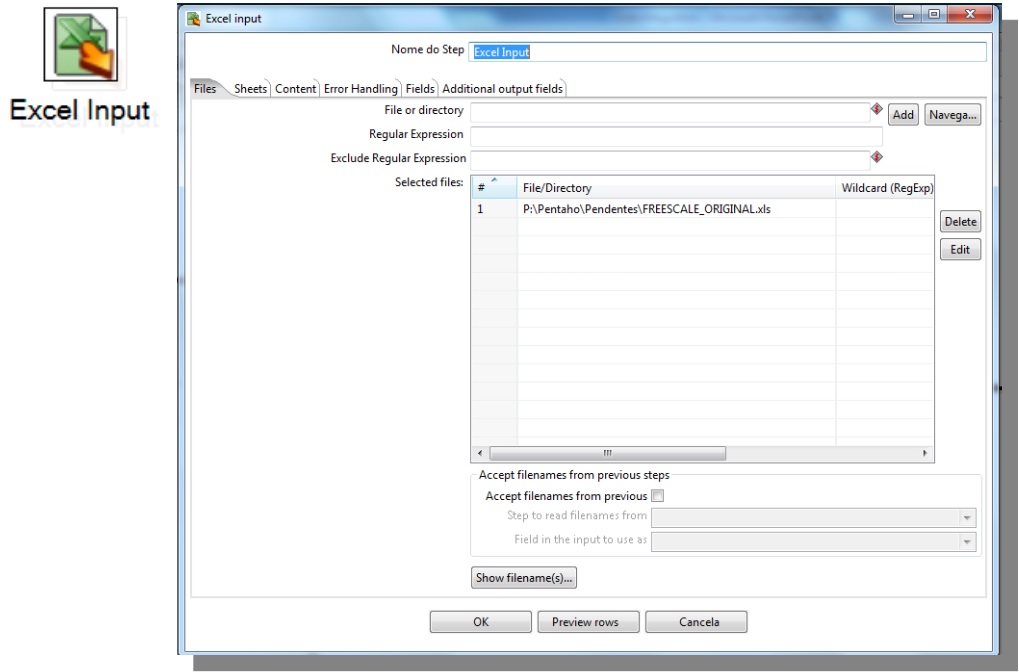
Excel Input
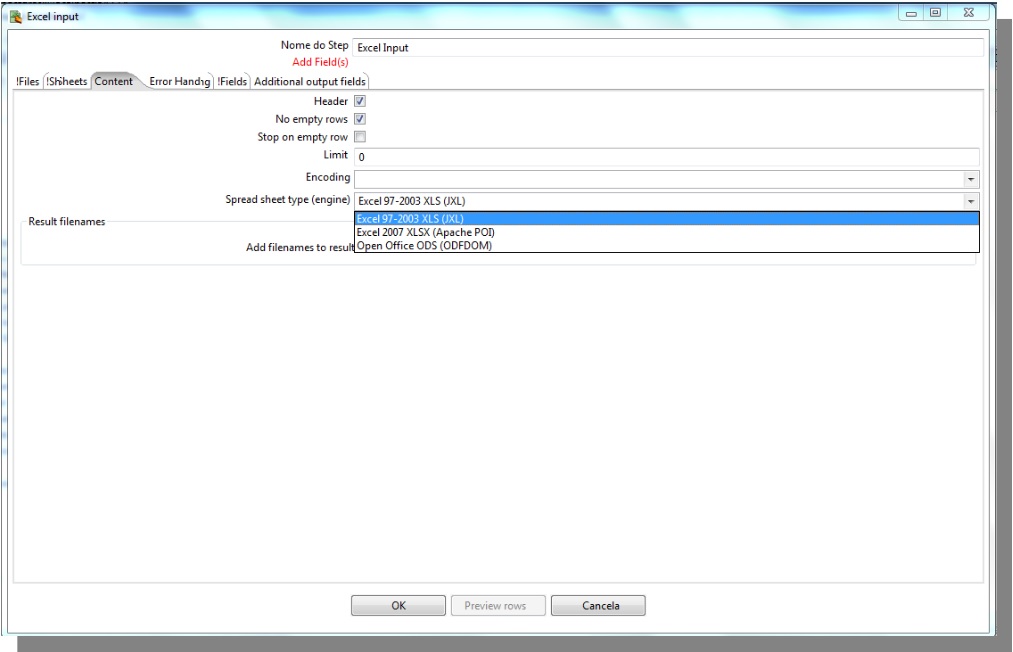
At the Content tab, select the format of the file to be imported (xls, xlxs ou ods)
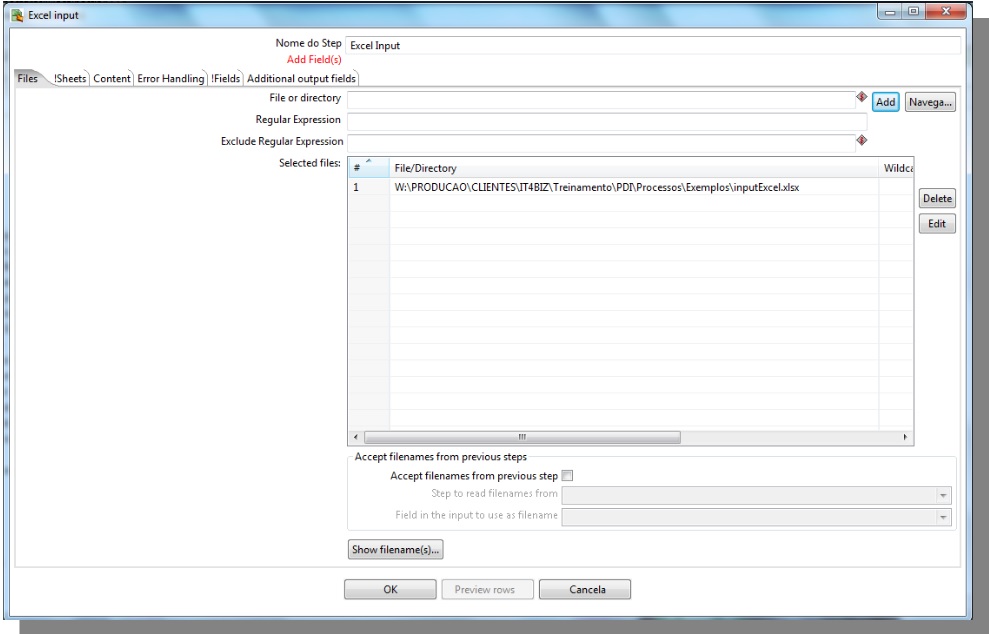
File or directory: Inform the origin of the file that will be used as input
-> Go to !Sheets tab
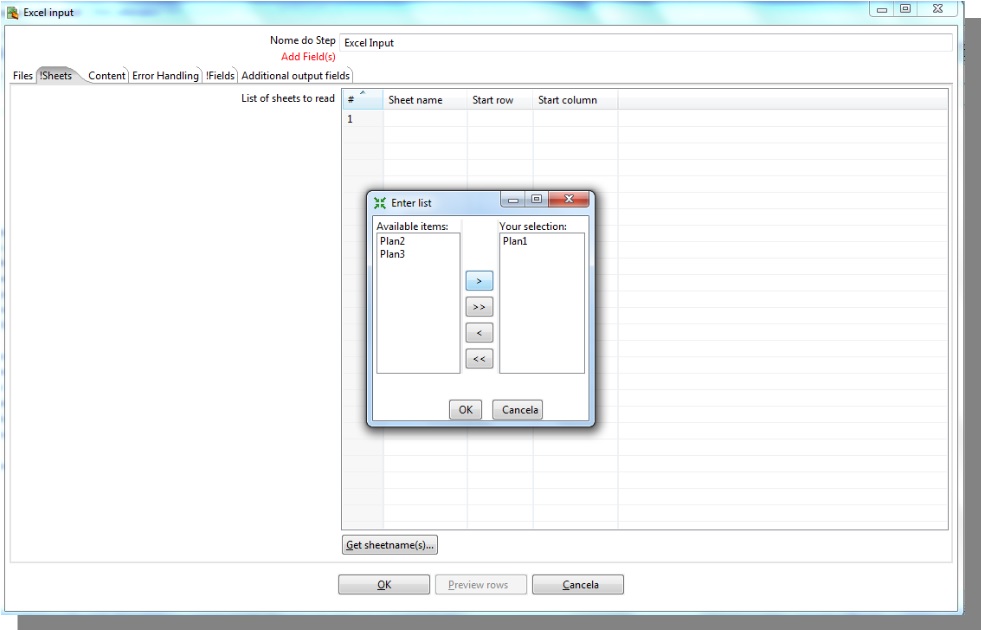
Get sheetname(s) : Click to inform the tab where the data are.
-> Go to !Fields tab
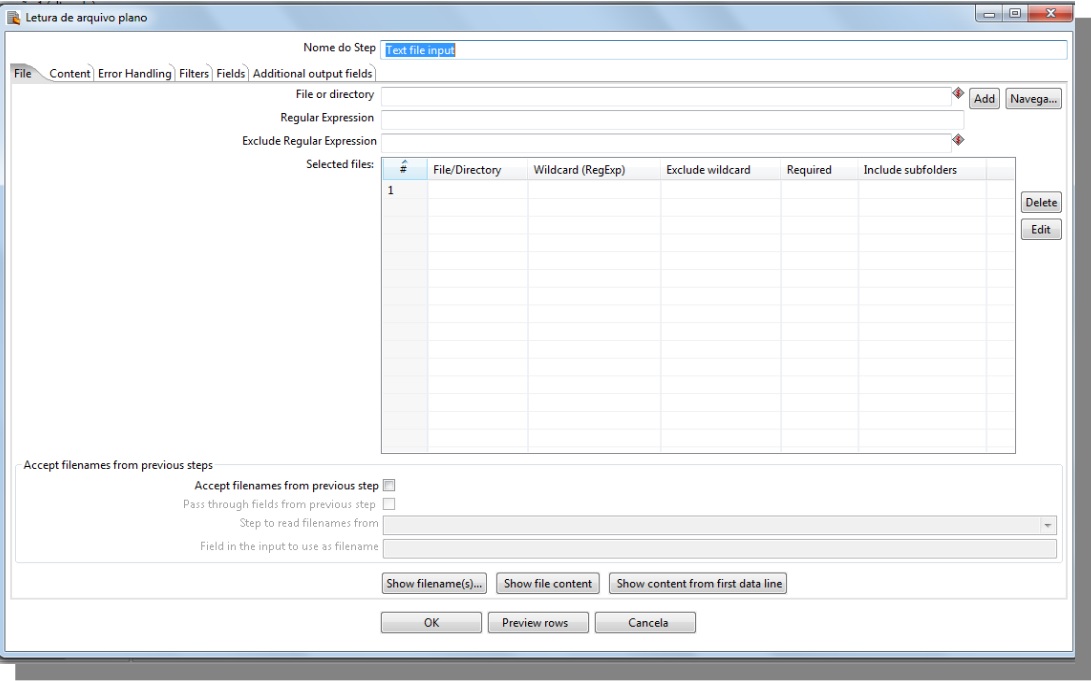
TXT Input
TXT Output
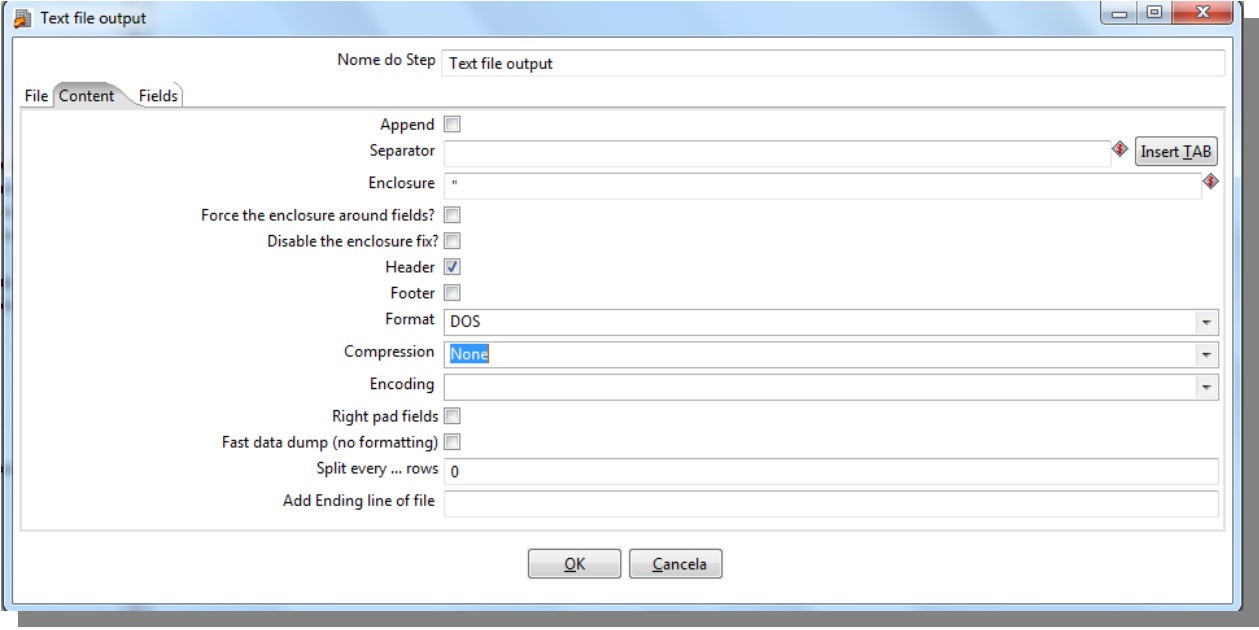
Separator: Choose the file delimiter, such as TAB, comma (,), semicolon (;) and pipe (|).
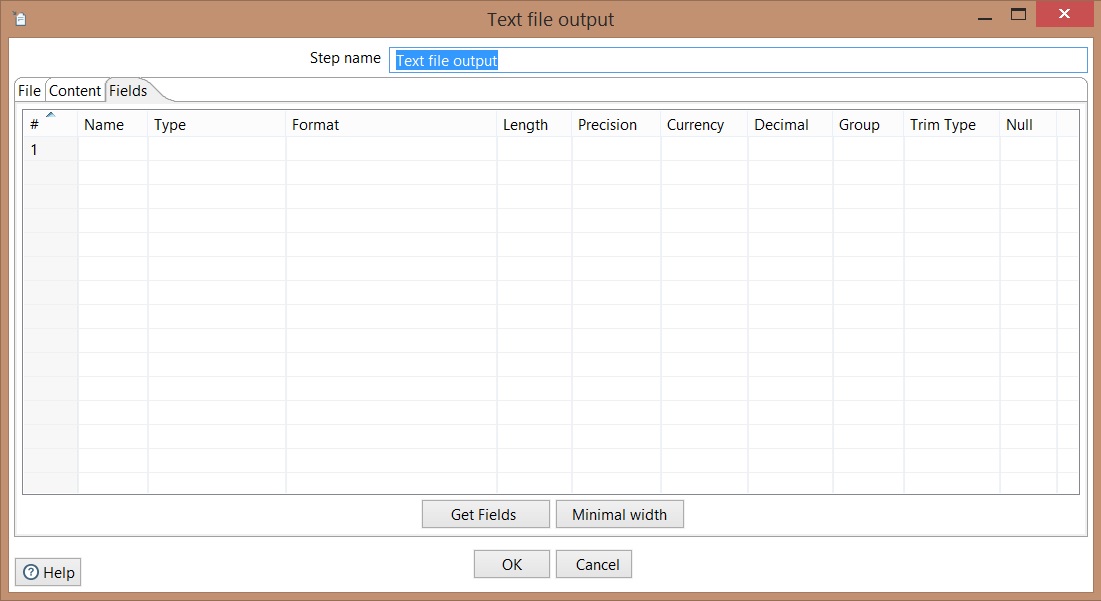
Get fields: Click to indicate fields that will be exported, types of fields and formatting
-> Click Ok
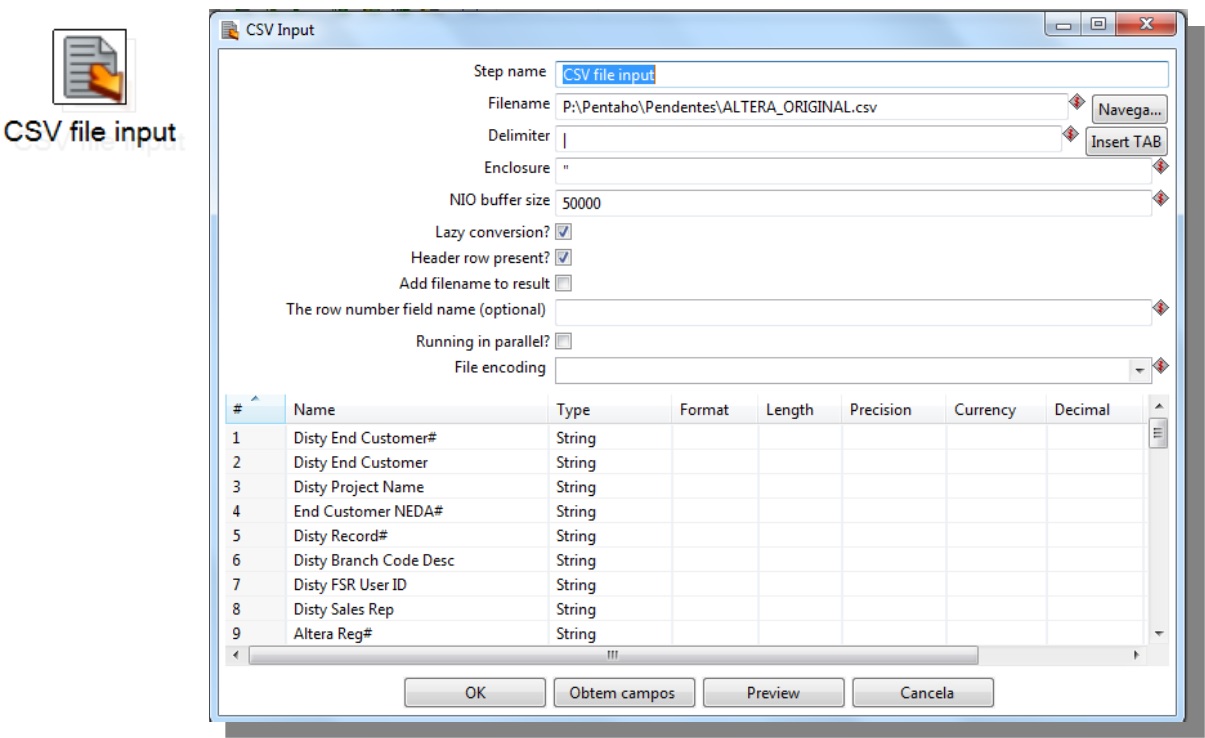
CSV Input
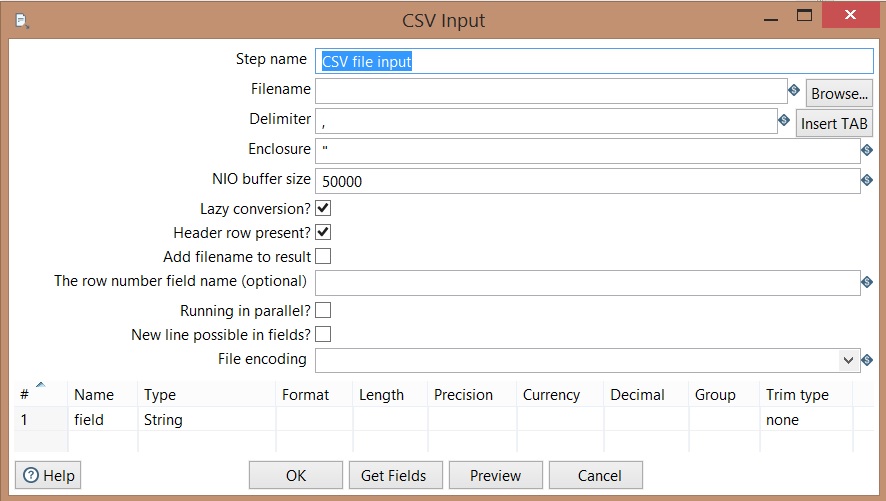
Filename: Informs the origin of input file;
Select Values
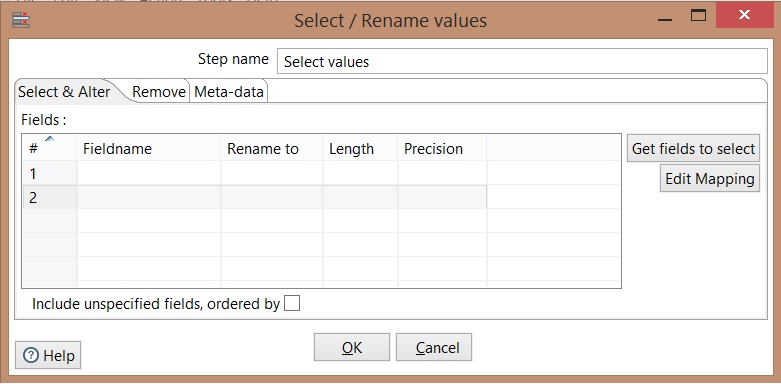
Get fields to select: Select data automatically
Select & Alter: alters name and specifies the exact order that the fields should appear at the output;
Remove: Specifies fields that will not be presented as output
Meta-data: alters name, type, length and fields precision.
Jobs
Start
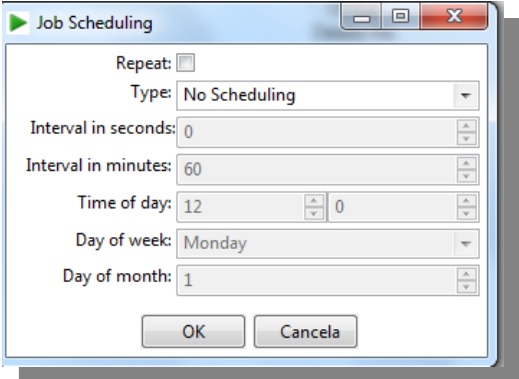
Repeat: Select if you want to repeat schedulling automatically;
Type: Choose the schedulling type (Daily, Days of week, Day of month);
Interval in seconds: informs the interval in seconds to repeat the process;
Interval in minutes: informs the interval in minutes to repeat the process;
Time of day: Informs time to run the processes;
Day of week: informs the day of the week to run the processes;
Day of month: informs the day of the month to run the processes.
Transformation
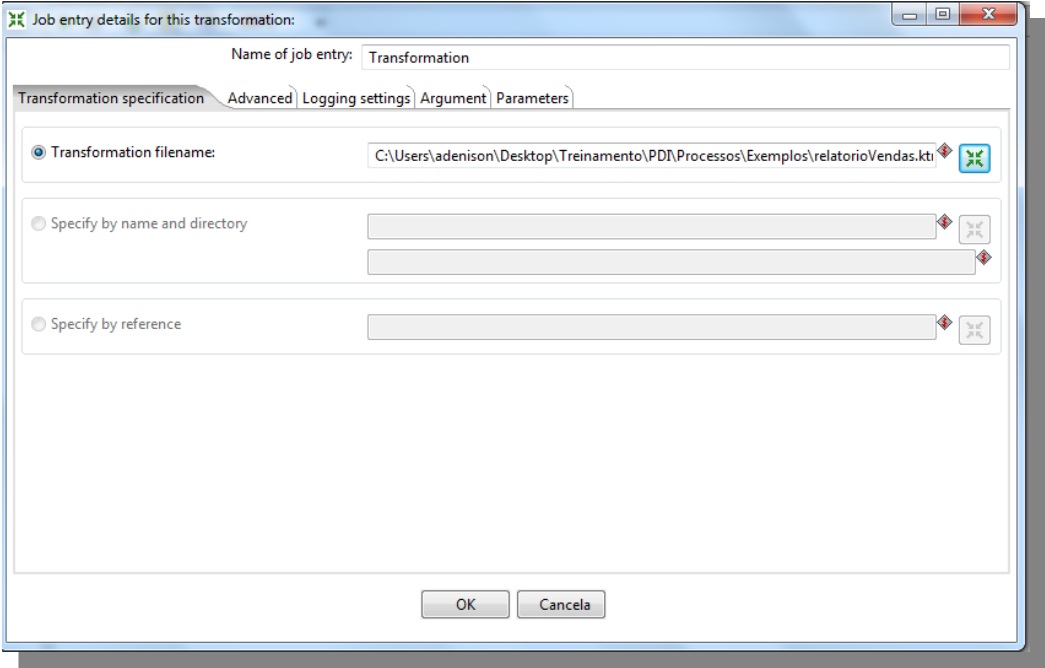
Transformation filename: informs the origin of transformation that will be executed.
Job
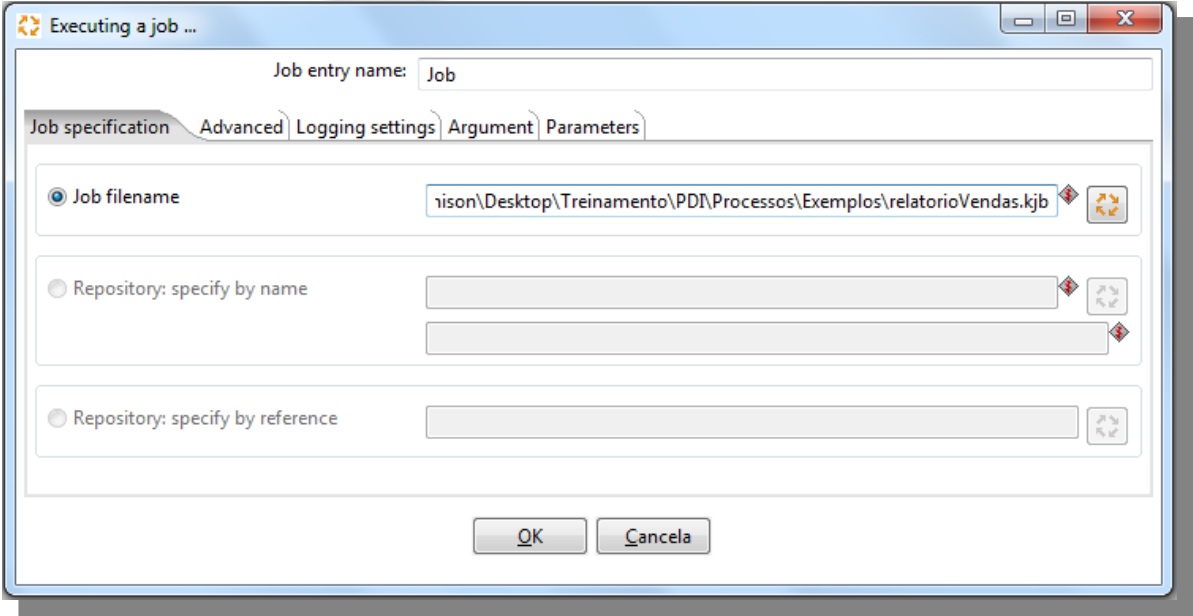
Job filename: Informs the origin of the job that will be executed
File Exists
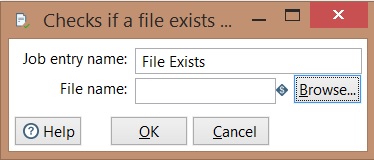
Useful step to check if a file exists
- Inform the path of the file;
- Click on OK.
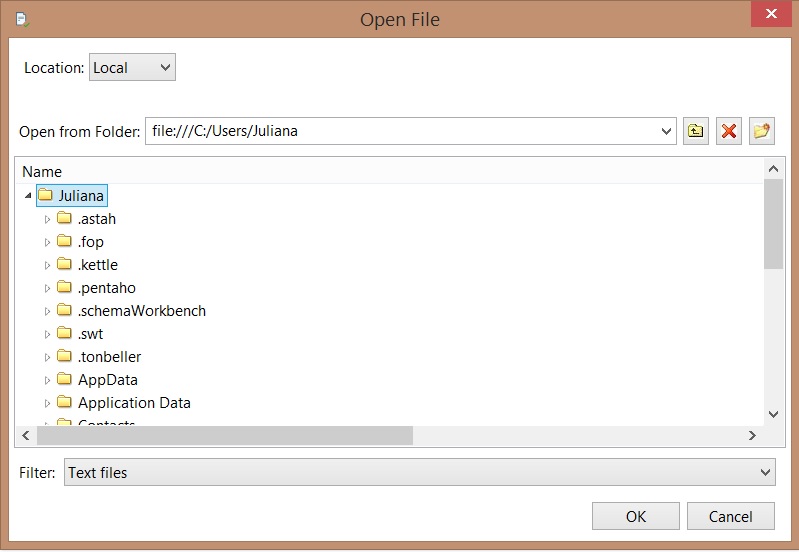
Table exists
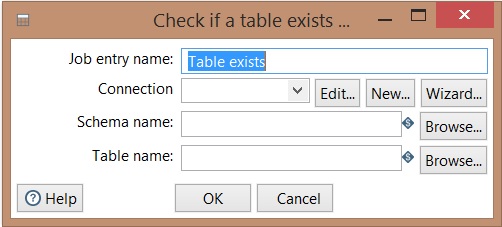
Useful step to check the existence of tables in a data source.
- Configure the database connection;
- Inform the schema where the table belongs;
- Inform the table;
- Click on OK.
SQL
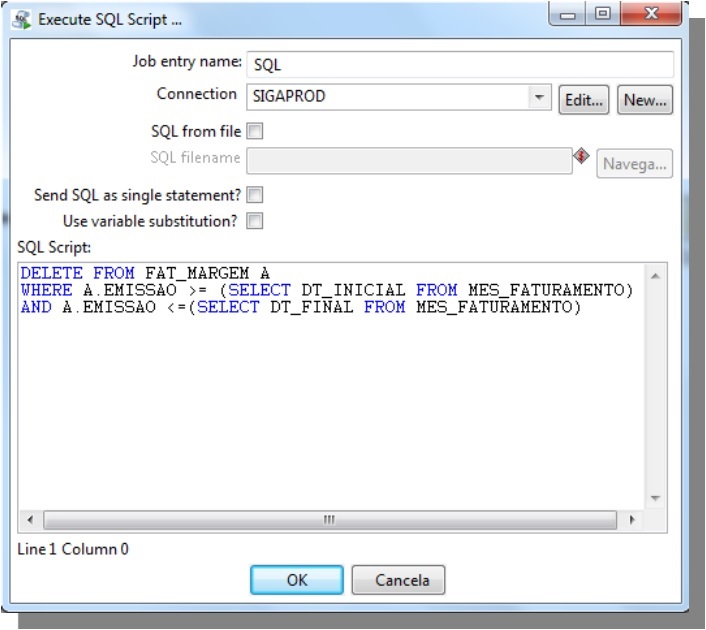
Connection: inform the connection;
SQL from file: Select this option to run a script
SQL script: Inform the query that will be executed
Extracting data from multiple sources
1st Data Source: Postgres
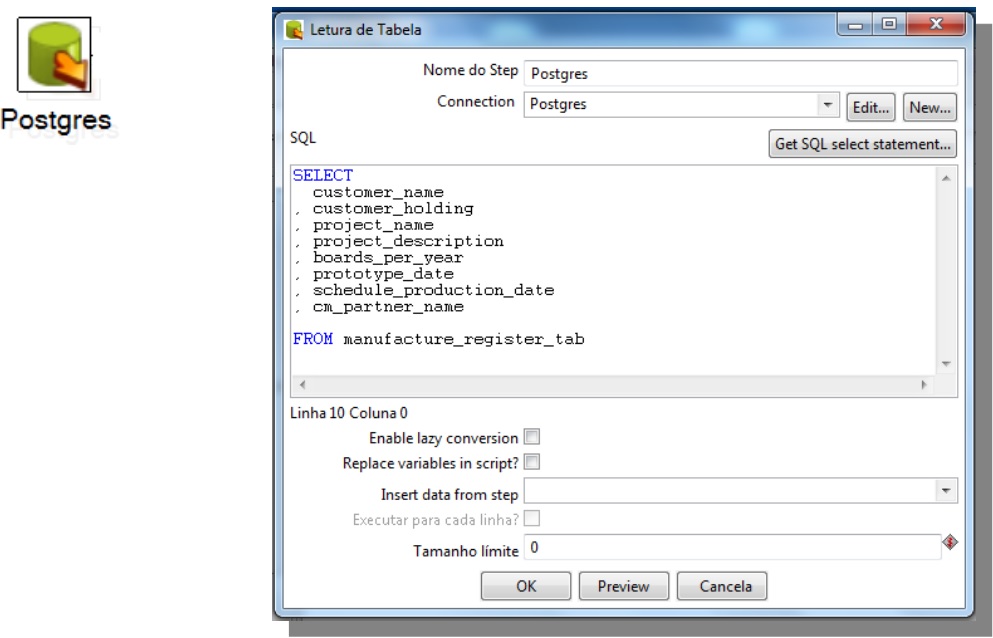
Extract information from PostgreSQL
2 nd Data Source:CSV
3 rd Data Source: Excel
Organizing data
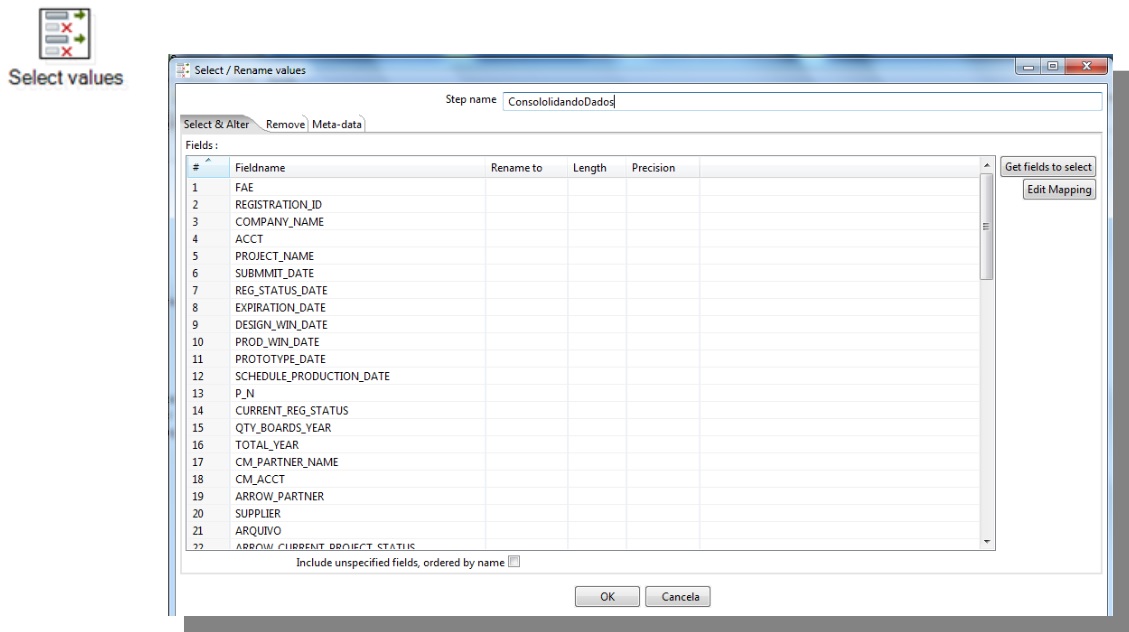
Click on Get fields to select the desired fields
Data Warehouse
Concept
Data Warehouse is where the company’s important data are store. It is catalogued in a organised and structured way.
Very often, a multi-dimensional modelling is used to build a data warehouse.
According to Inmon (1997), creator of the concept, Data Warehouse “is a collection of integrated data, subject-oriented, variable over the time and non-volatile, used to support the management decision-making process.”
According to Kimball (1997), the process of bulding a data warehouse has nine stages.
They are:
- Select the business process to be modeled;
- Define granularity (details) of business process;
- Choose dimensions to fact table;
- Identify numeric facts (metrics);
- Store pre-calculated data into fact table;
- Load dimension tables;
- Prepare dimensions to support improvements (changes);
- Define the time amplitude to database history;
- Define the period of time that data are extracted and loaded in DW.
Creating a Data Warehouse
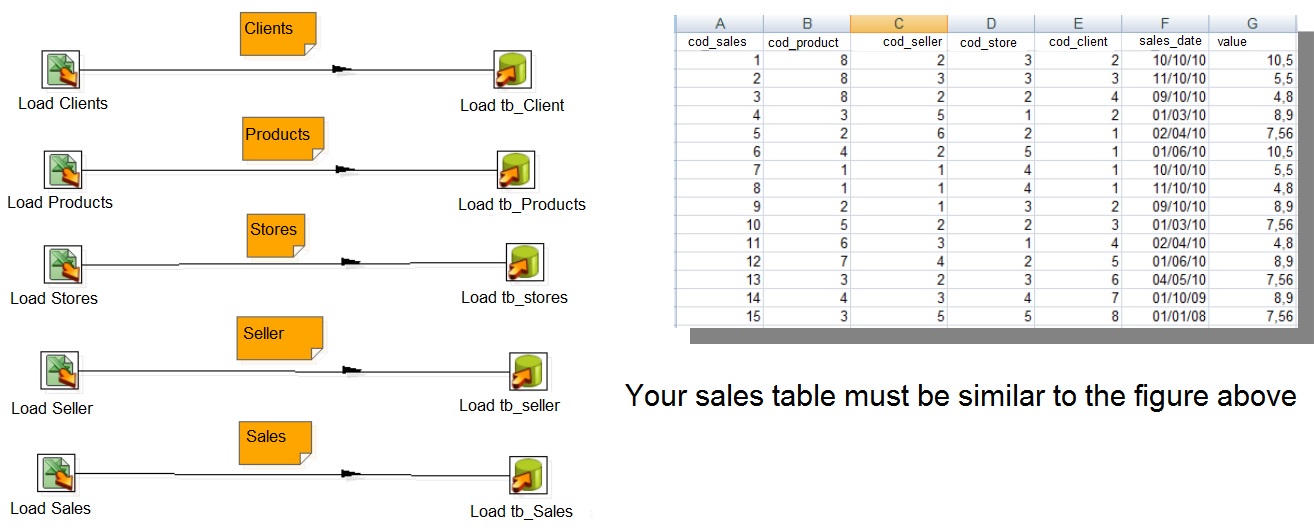
- Creating Database tables
Creating Dimensions
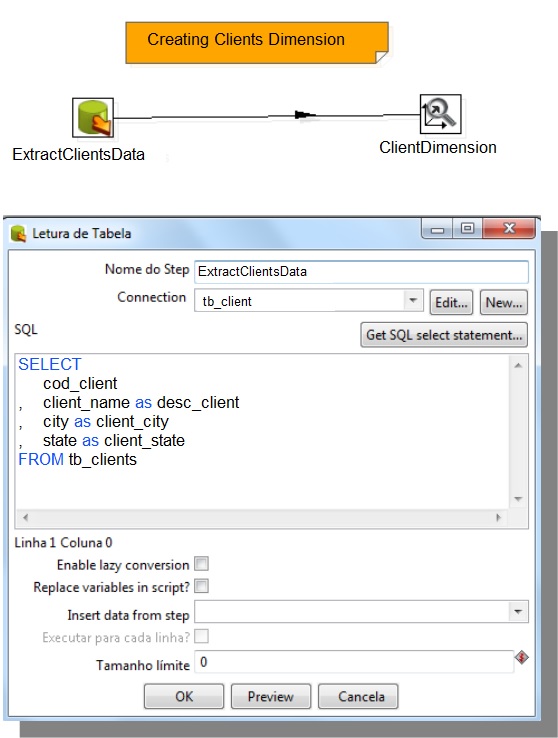
It is recommended that each transformation deals only with one dimension, fact table or variable manager.
This pattern will help on job creation.
Dimension Lookup / Update
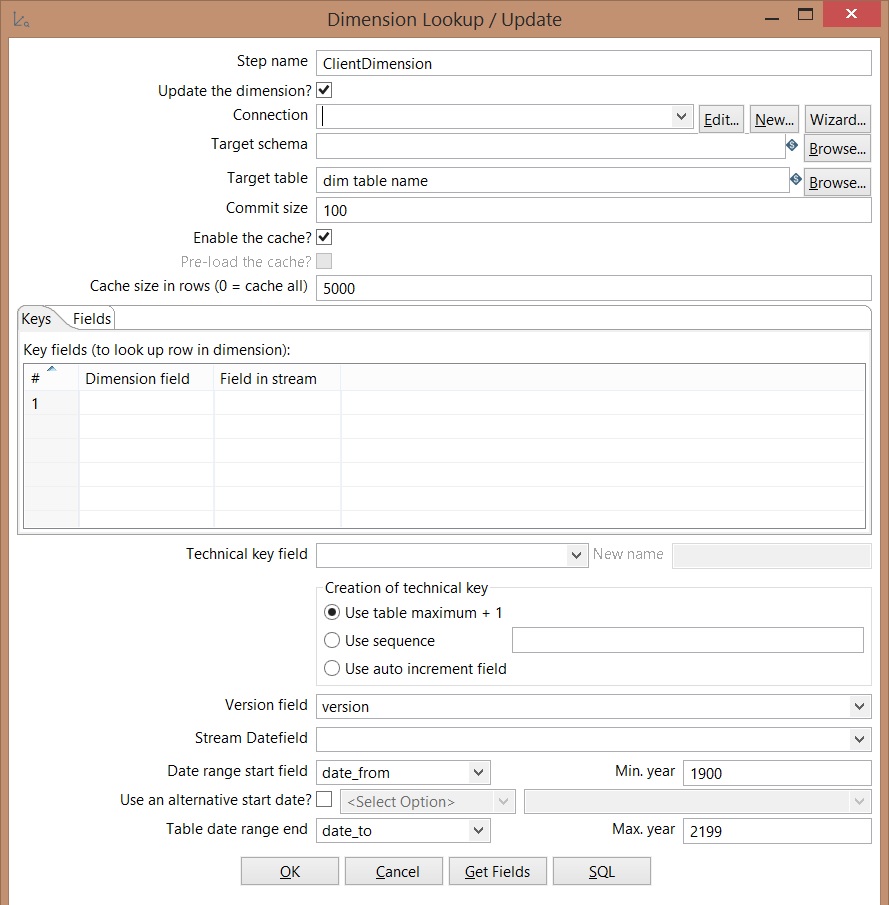
Update the dimension: Updates dimensions based on input flow;
Target table: dimension name;
Commit size: Commit each X insertions or updating.
Technical key field: dimension business key or primary key;
Use table maximum +1: a new technical key will be created from a table key
Date range start field: Input data from insertion or updating
Table daterange end: Date of last insertion or updating
Click on SQL -> Run to create dimension
Use this pattern to create other dimensions
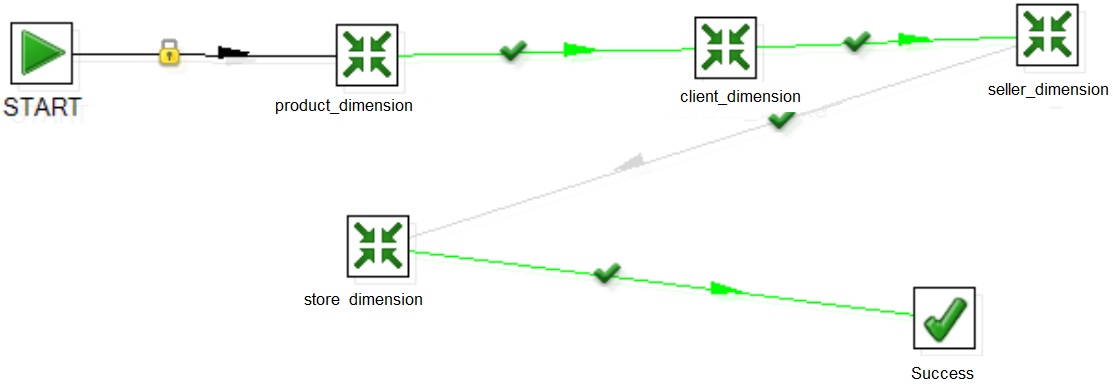
Create a process to run all the dimensions transformation sequentially
Creating a Data Stage
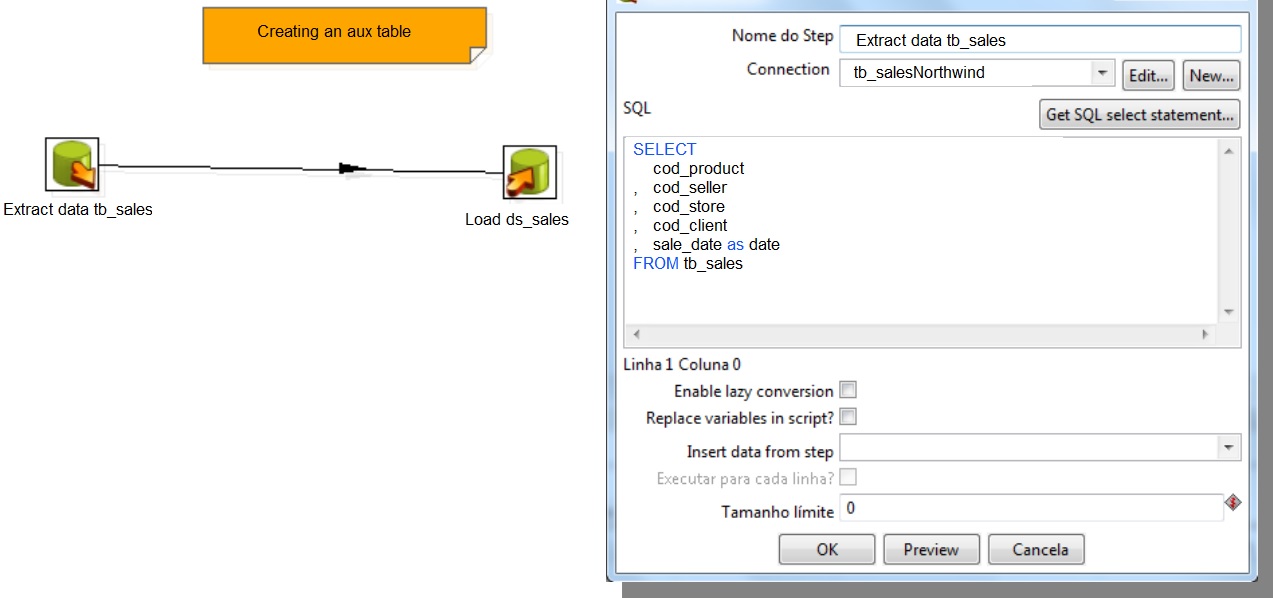

Click on SQL -> Run to create aux table
Creating Fact Table
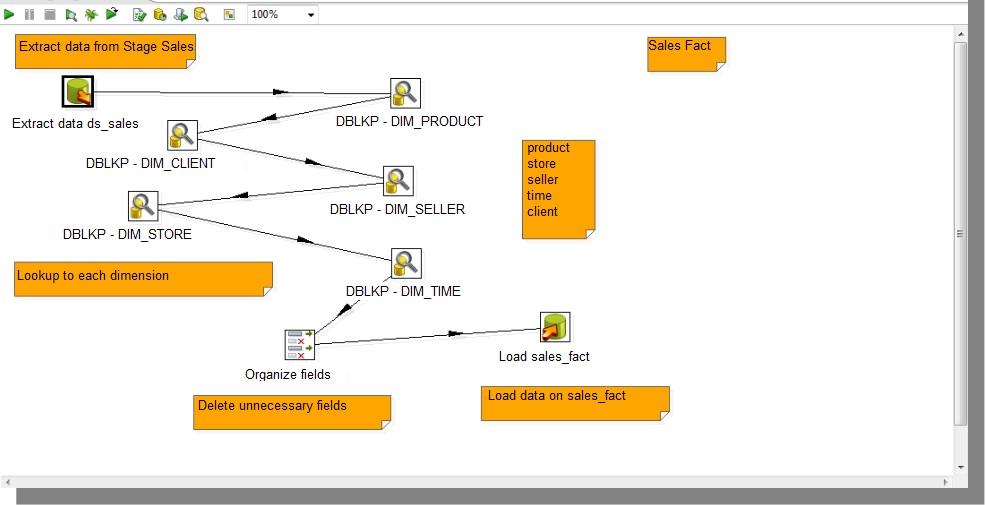
- Connect on Data Stage and select only primary keys;
- Create a lookup to each dimension;
- Select only ID fields and remove others use select value;
- Load data on fact table.
How to use Slowly Changing Dimension on PDI/Kettle
Slowly Changing Dimension on PDI
SCD Type 1:
- It does not keep data information, this implementation does not trace historic data
- Every time a change is made on a record, the information is updated.

Loading Client Dimension
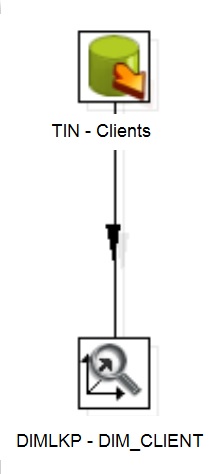
Loading Client dimension – Keys tab
Component: 
Select: 
Comparative fields: 
Technical key: 
The remaining fields at Keys tab are set as Default

The Type of dimension update column must be defined as Update
Loading Client Dimension at fact table
Component: 

Properties of Database Lookup component:


SCD Type 2
- Keeps data history;
- Inserts a row to each change at the records, saving the version of the altered record;
- There is no limit of changings, this implementation keeps all the history of changes.

Loading Client Dimension - Keys tab
Component: 
Select: 
Comparative Fields: 
Technical Fields: 
The remaining fields at Keys tab are set as Default

The type dimension update column must be defined with Insert
Loading Client Dimension at Fact Table
Component: 


Only the following fields must be set:

Table Output Component : 
Truncate table option must not be selected: 
HTTP Client - Chamada de serviços HTTP

- Call a web service through HTTP
- URL allows the dymanic adjust of parameters
Documentation – HTTP Client Component: http://wiki.pentaho.com/display/EA/HTTP+Client
ETL and Kettle documentation - CookBook
Installation – Kettle CookBook
Installation requirements
- PDI 5.4.0.1-130
- Link Kettle CookBook project: https://code.google.com/p/kettle-cookbook/
Utilization (Linux):
sh kitchen.sh –file:/parking/kettle-cookbook/pdi/document-all.kjb -param:”INPUT_DIR”=/project/dwh/kettle/ -param:”OUTPUT_DIR”=/tmp/output
Kettle CookBook – IT4biz – Example:
http://www.it4biz.com.br/cursos/kettle-cookbook/Samples/
Transformations and Jobs Examples
With PDI Kettle it is possible to use WebServices

Example created to CONSEGI 2010 event, Web Service demonstration
http://www.it4biz.com.br/cursos/consegi2010/exemplos_kettle_webservices.tar.gz
Logs
Displaying Logs
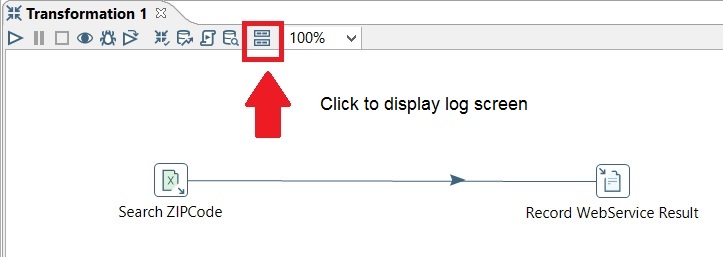
Configuring Logs Level
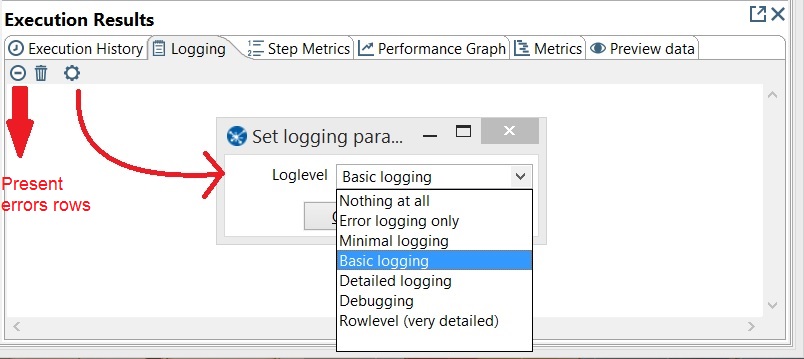
Log Screen
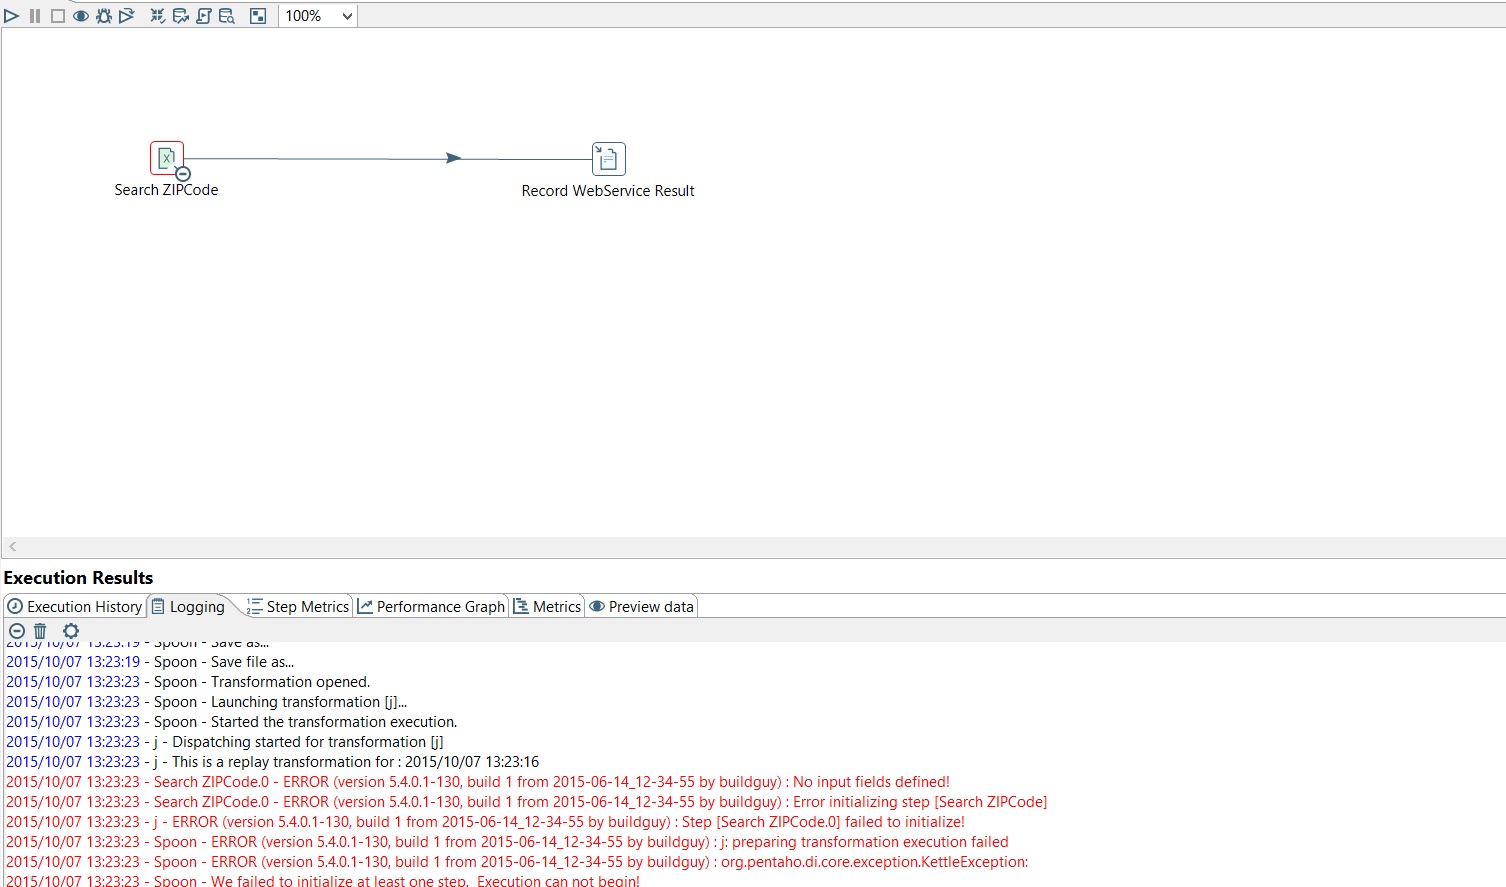
In Case of error during the process, PDI will show where the error is, Highlightening the step and errors row in red.
Error Handling
Error handling resource avoids the stopping of transformation in case of existence of data consistence error
The advantage in use this resource is to record inconsistent data in another place in order to complete the ETL process
 Practice:
Create a PDI transformation that reads client’s data from an excel file and records it at postgres database.
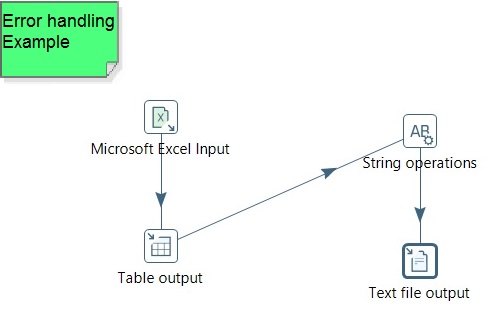
Insert the following components:
- Excel Input
- Table Output
- String Operations
- Text file Output
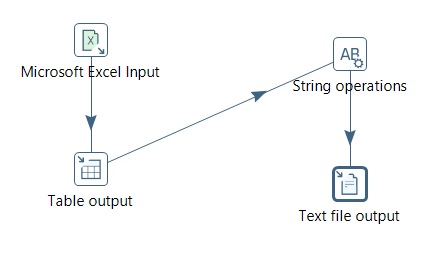
- Connect hops as the image above
- Configure Excel Input component to read client’s data
- After select a sheet, define the fields to be read

- Configure Table output component to record client’s data

It must include: (from PDI5.3.0.0.213-2015-02-16.pdf)
- DDL to create client table:
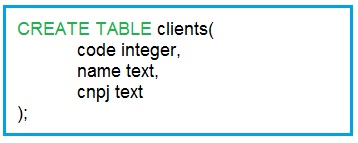
OBS: The sheet that will be loaded is on examples directory.
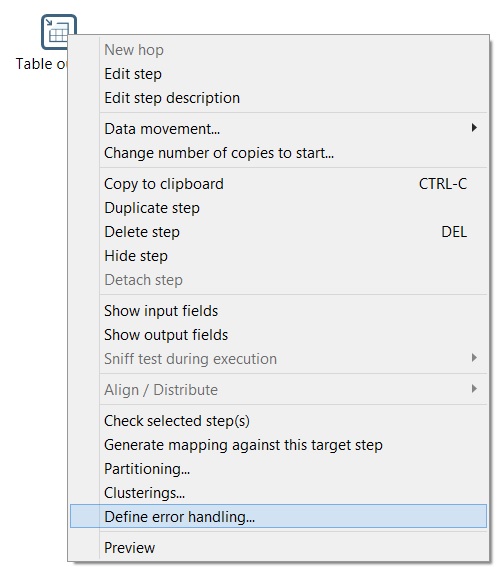
- Right click on table output component and then click on error handling option.
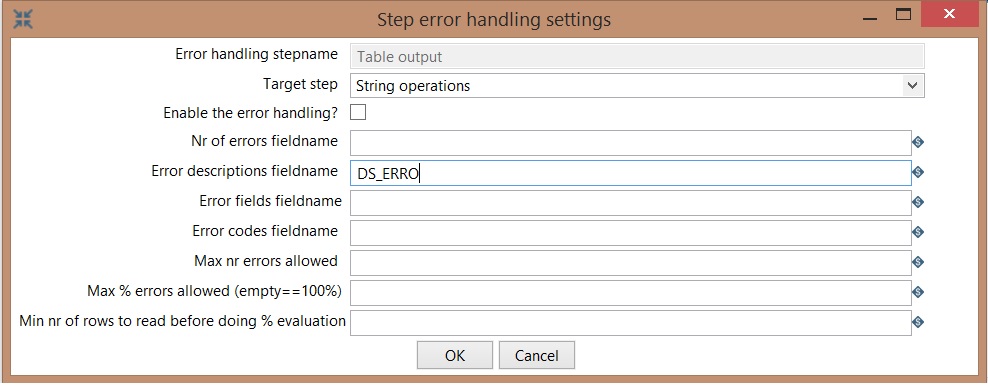
- At error handling configuration screen, insert the following properties:
- Target step: String operations
- Enable the error handling?: Enable
- Error descriptions fieldname: DS_ERRO
- Open String Operations component and then insert DS_ERRO field
- At the same row of DS_ERRO field, at remove special caracter column, insert the carriage return & line feed property.

This configuration allows that possible errors are recorded in different rows
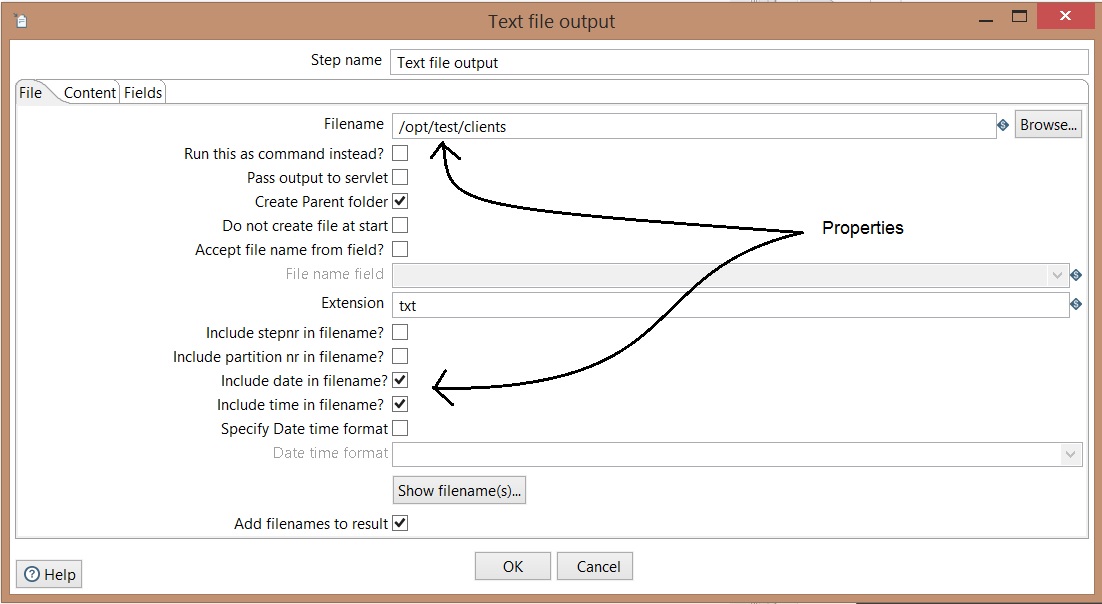
- Open Text output component, insert the following properties on File tab:
- Open Text output component, insert the following properties on Fields tab:
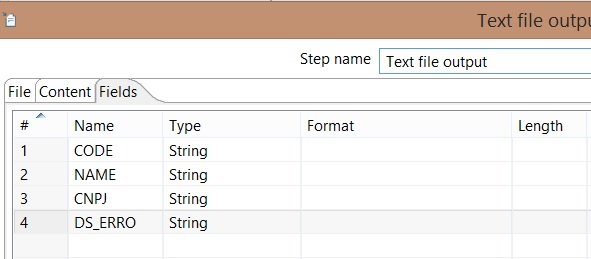
OBS: Change CODE field type to String. If errors occur, the content of the field will be presented as String.
- Run transformation to test data recording
- This example will record all data with success, because excel data are 100% consistent
Produce an inconsistent on the sheet. To do so insert 12345678956345200000 code to REDE FELDER client
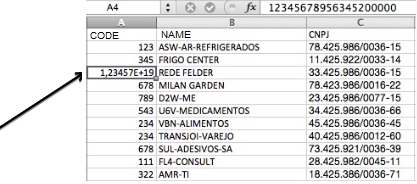
Save the sheet and perform another load
- As soon as the transformation runs, an error file is created at the rejected directory:
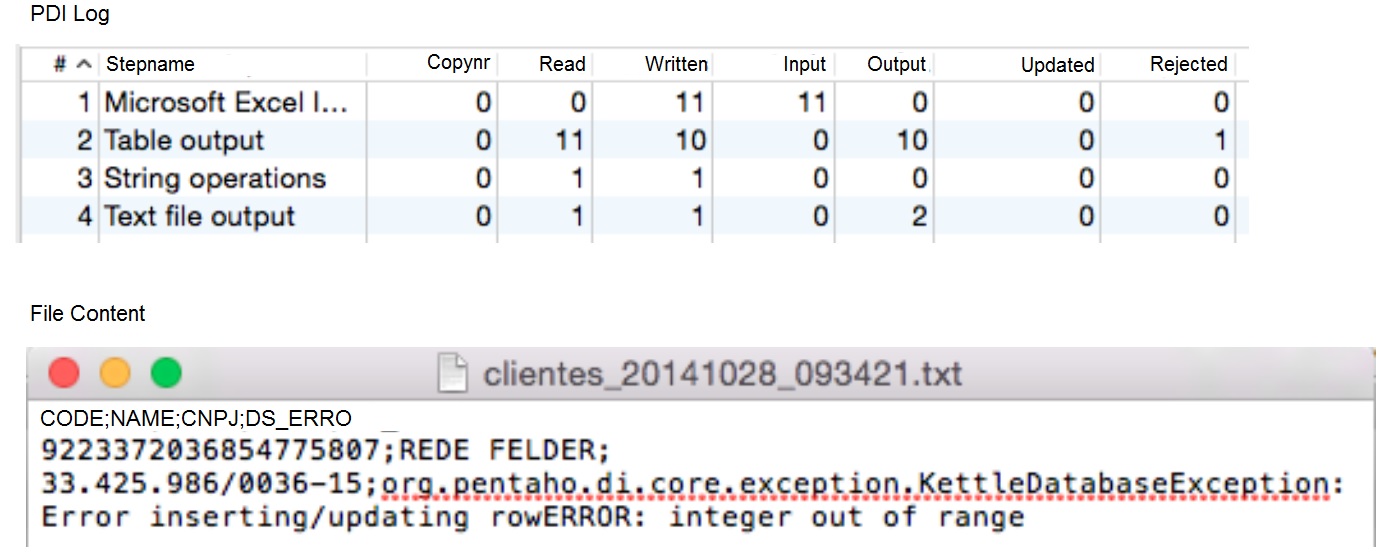
Schedule, jobs execution and monitoring from command line
Kitchen (Text)
Kitchen is a simple way to schedule your jobs It is simple to configure and consumes little memory.
Windows:
- Open notepad;
Enter the command below:
kitchen.bat/file:C:\Treinamento\ETL\update\Warehouse.kjb /level: Basic
Save file with .bat extension
Linux:
Enter the command below:
kitchen.sh-file=/Treinamento/ETL/meuJob.kjb –level=Basic
Kitchen (Text and Log)
Windows:
- Open notepad;
Enter the command below:
kitchen.bat/file:C:\Treinamento\ETL\update\Warehouse.kjb /level: Basic > C:\LOG\trans.log- Save file with .bat extension
Linux:
Enter the command below:
kitchen.sh-file=/Treinamento/ETL/meuJob.kjb –level=Basic >> /LOG/trans.log
Kitchen (BD)
Windows:
- Open notepad;
Enter the command below:
kitchen.bat/rep etl_desenvolvimento /dir Contabil /user admin /pass admin/ job job01Contabil- Save file with .bat extension
Linux:
Enter the command below:
sh kitchen.sh /rep repository_etl /dir 7_FALTAS / user admin /pass admin / job CARGA_FALTAS
Pan
Pan, just as kitchen, has simple configuration and little memory consuming
Windows:
- Open notepad;
Enter the command below:
pan.bat / file: C:\Treinamento\ETL\updateWarehouse.ktr /nivel: Basic
- Save file with .bat extension
Linux:
Enter the command below:
pan.sh –file = /Treinamento/ETL/updateWarehouse.ktr – level = Minimal
Schedule

To schedule Jobs or Transformations it is necessary to use Windows Scheduler or CRON (from Linux)
Cluster
Carte
Carte is a simple web server that allows the execution of jobs and transformations remotely.
It accepts XML (using a small servlet) with the transformation to run the configuration.
It also allows remote monitoring, the starting or stopping of transformations and jobs at Carte server. The server running Carte is called Slave according to PDI terminology.
Starting Carte
In order to start carte server, at PDI folder look for carte.sh (Linux) or carte.bat (Windows).
The carte services can be started from terminal:
sh carte.sh server_ip 8081

Example:

sh carte.sh 192.168.10.105 8081
Carte Log
Below we have an example of Carte Log
Sudo sh carte.sh 10.105.186.128 8081 2009/07/24 15:09:25:942 BRT [INFO] DefaultFileReplicator - Using “/tmp/ vfs_cache” as temporary files store 2009-07-24 15:09:26.063 :: INFO: Logging to STDERR via org.mortbay.log.StdErrLog INFO 24-07 15:09:26,092 – org.pentaho.di.www.WebServer@3efc3efc – Created listener for webserver @ address : 10.105.186.128:8081 2009-07-24 15:09:26.101::INFO: jetty-6.1.9 2 0 0 9 – 0 7 – 2 4 1 5 : 0 9 : 2 6 . 4 8 4 : : I N F O : Started [email protected]:8081
Slave Server
In order to create slave server it is necessary to configure PDI as presented below:
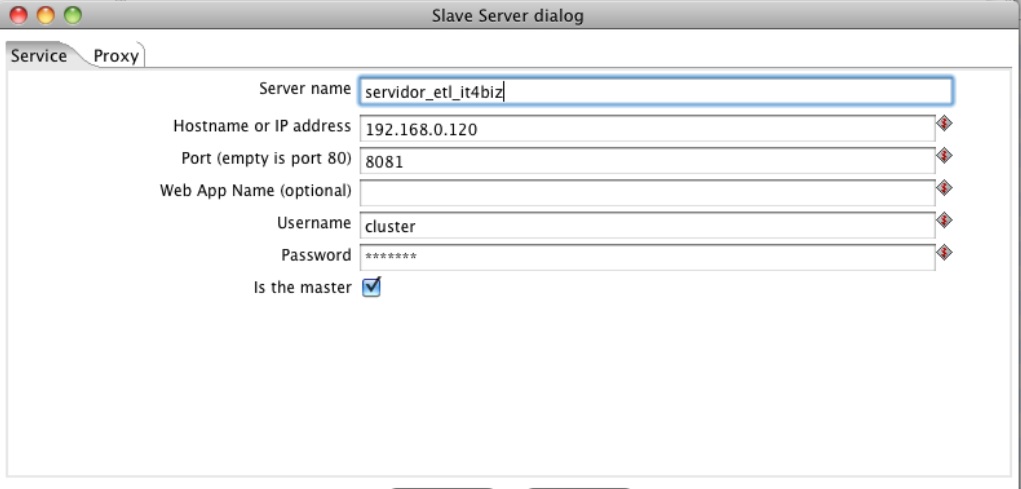
User and standard password:
User: cluster Password: cluster
There is also the possibility of encrypting the password using encr.sh
When remote server is created select master= true option to the first server
Metadata Injection (XML, Tables and CSV files)
The objective of working with Metadata Injection is to define an ETL routine that will be used as a model to dynamically load metadata.
Instead of creating a job to load each XML, text file, table or CSV, it is possible to define a job that will be responsible for loading data dynamically.
Documentation
http://wiki.pentaho.com/display/EAI/ETL+Metadata+Injection
Common Problems
Forget to add Hop;
Forget to put a technical key fields;
In case of using PostgreSQL as DW use Numeric (17,17) leading to field overflow;
Forget of running SQL when creating dimensions;
Forget of defining target table;
Do not define database connection properly;
Do not insert fields on key fields tab;
Do not insert fields on fields tab;
Use some unacceptable format to the database when creating a technical key. Example: MySQL uses auto increment, PostgreSQL only accepts sequence and table maximum+1;
Do not select Update the Dimension checkbox, altering component behavior;
Kitchen and Pan are on data integration folder, .bat or .sh file, so do not forget of inserting the path of data integration
C:/Treinamento/PDI/tools/data integration
kitchen.bat / file: C:\Treinamento\ETL\updateWarehouse.kjb  /nivel: Basic
Use Windows Scheduler to run an automatic process, or Crontab on Linux;
Forget of mapping the connection properly;
Do not rum SQL script to create dim_time table.